• About
  • Advertising
  • Contact
  • Meet the Team
  • Blog
    • Bloglovin
    • Facebook
    • Instagram
    • Pinterest
    • Twitter

Eighteen25

Create A Life You Love.

  • Home
  • Printables
  • DIY + Crafts
  • Holidays
  • Recipes
    • All Recipes
    • appetizers
    • salads/side dishes
    • main dishes
    • Desserts
  • Misc.

Today’s Guest: The Polkadot Chair

Sep42011 posted by Jamie 15 Comments

Are you loving everything so far?
We sure are!!
And with all of our fabulous guests, how can you not love it all!!
. . . . . . . . . . . . .

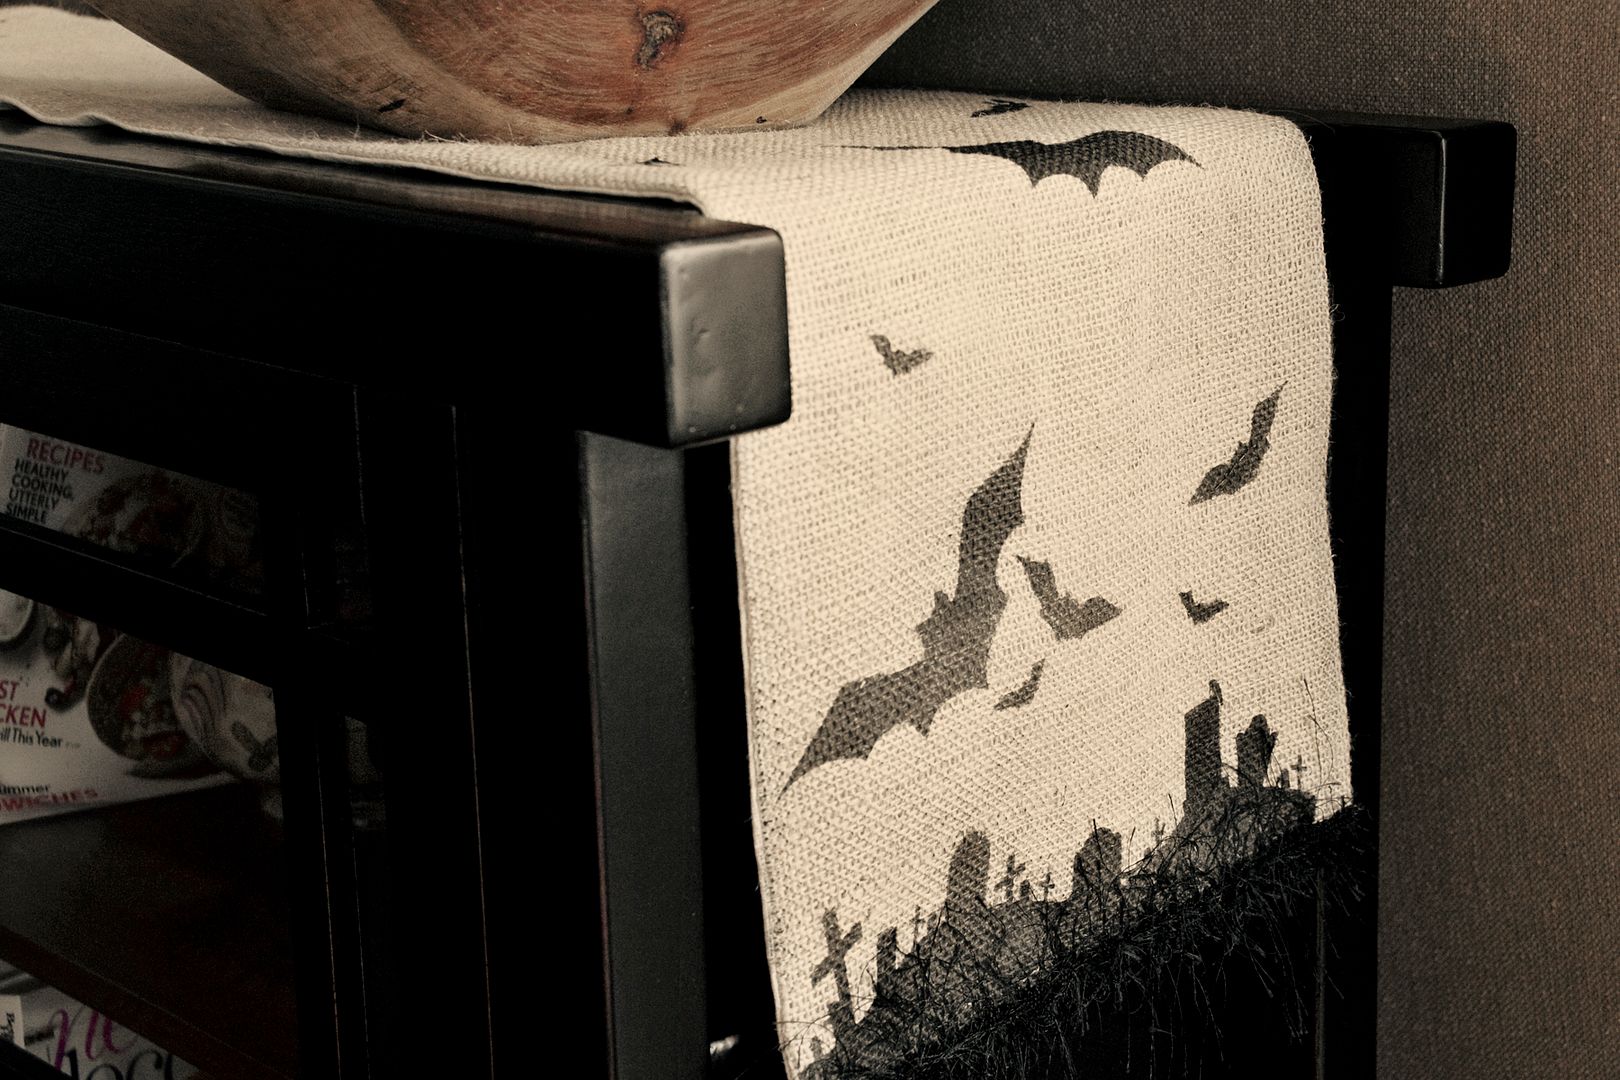
Hi there Eighteen25 readers! My name is Melissa Mortenson and I blog over at the Polkadot Chair! I’m so excited to be sharing this super simple Spooky table runner with you today!

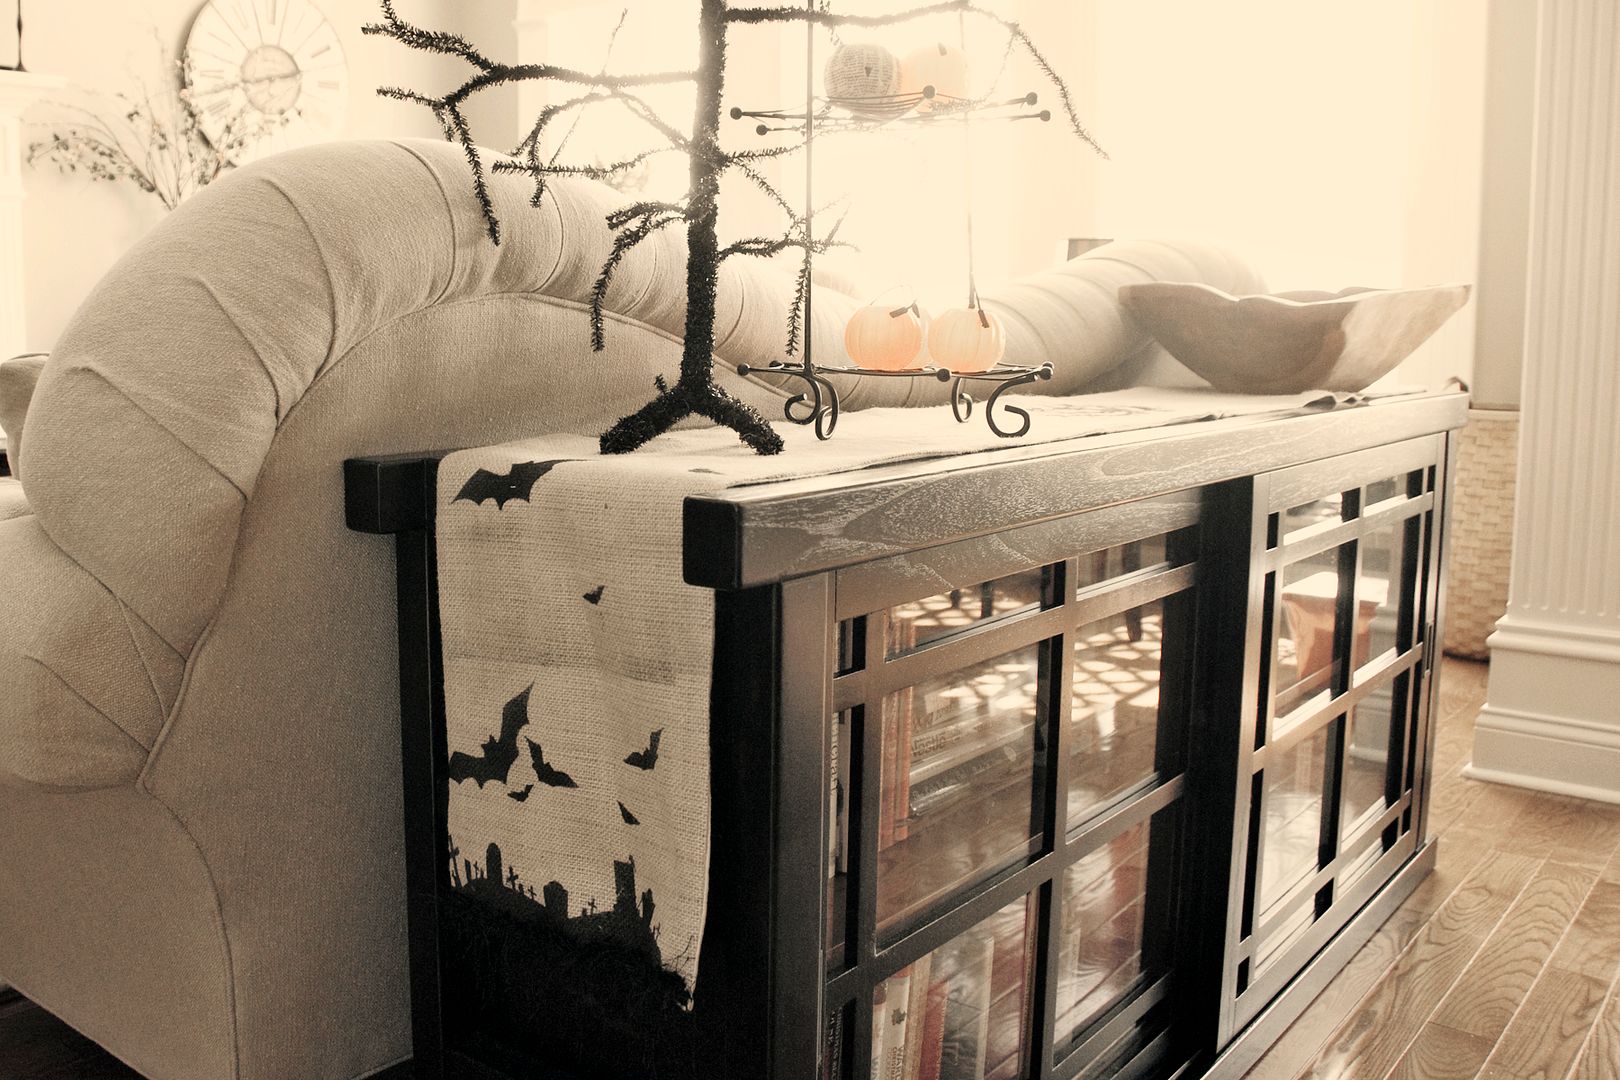
The runner is made from burlap and goes together very quickly!

For this project you will need:

-Burlap
-Unbleached cotton or muslin (some cheap fabric to line the runner with)
-Freezer paper
-Spray Paint
-Some type of e-cutter (i.e. cricut, silhouette) or an exacto knife.

The first thing you want to do is decide what size to make your runner. I decided to make the finished size of mine 11″x88″ (I have a long table).

Then cut your burlap WIDER than you want it. For example since I wanted my runner to be 11″ wide I cut the burlap 12.5″ wide. Burlap is very tricky to work with and can easily fray-  so if you cut it wider it will give you some wiggle room with the finished project.

Then cut your lining material 1″ wider than your finished runner.

Next with the shiny side of the freezer paper facing down, cut out your design.  I used a silhouette on regular paper setting and it worked fine. If you don’t have an e-cutter you can easily cut freezer paper with an exacto knife.

Remove the design- discard- for this project you want the negative of the design.

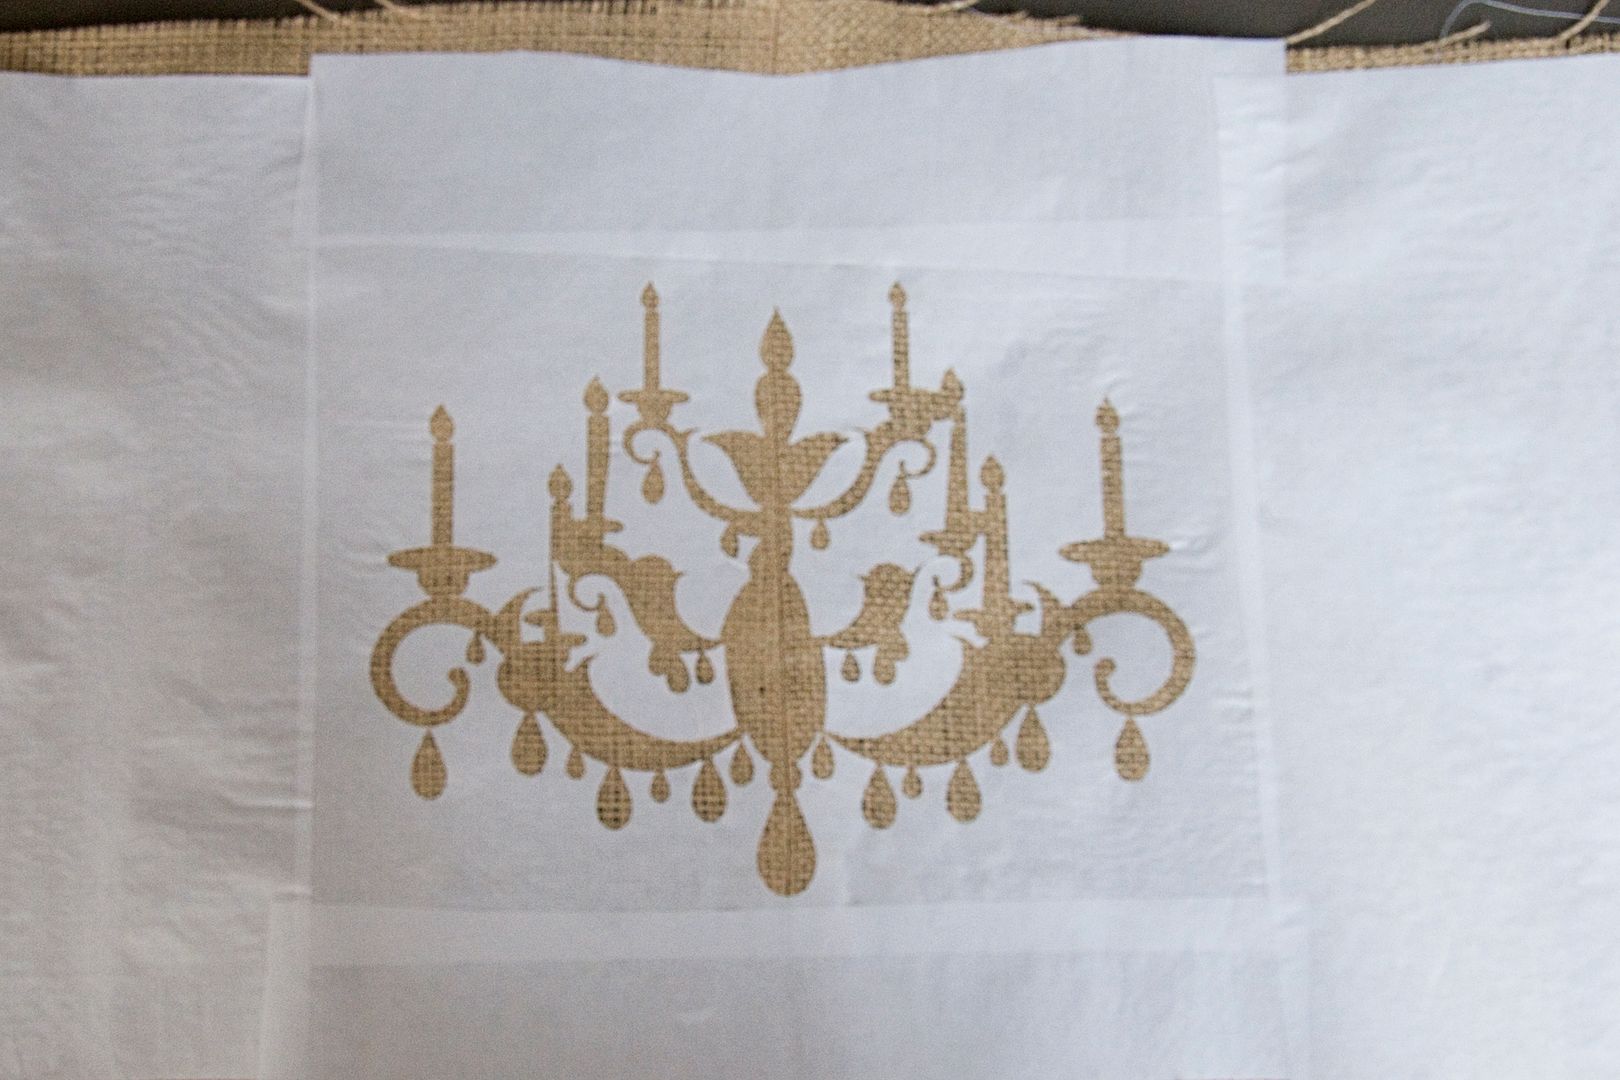
Iron the design onto your burlap where you want it. The shiny side of the freezer paper melts and sticks to the fabric.

For my design, I put one design in the center then one design on each end.

Make sure you cover the rest of the burlap with extra freezer paper. The spray paint has quite a bit of overspray. Don’t skip this step!! 

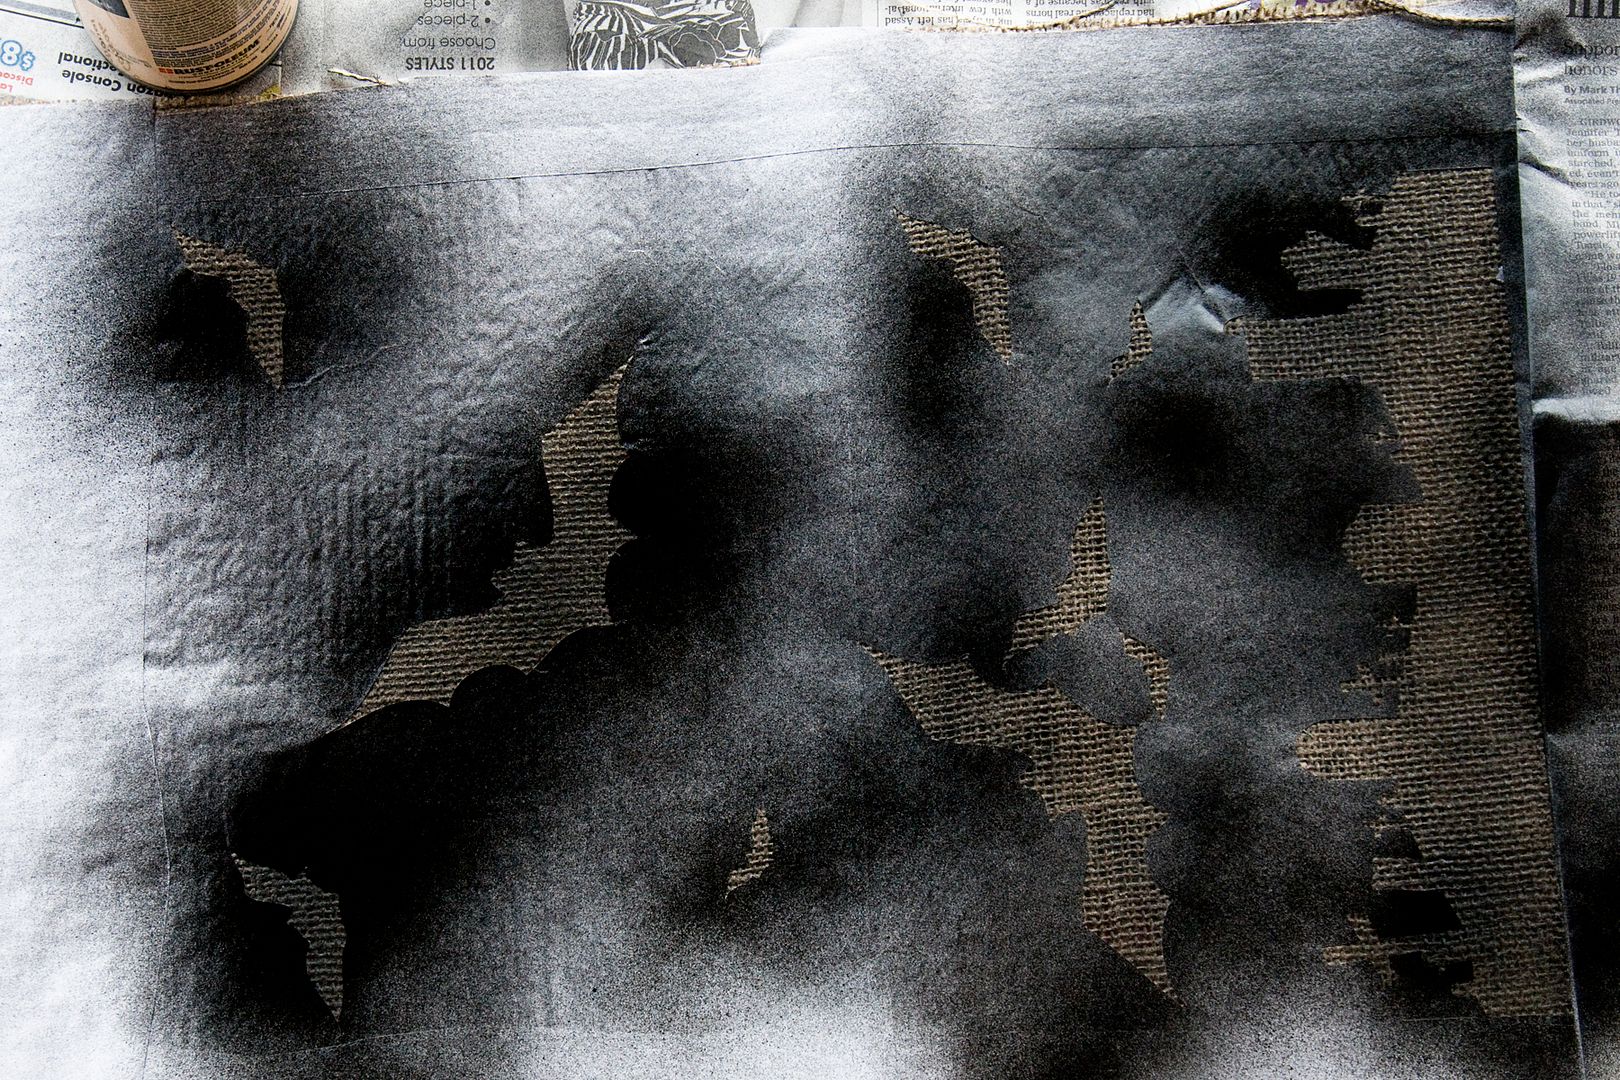
Next spray over the design onto the burlap.  Make sure to spray evenly. Wait for it to dry, then peel off the freezer paper.

You are left with your design!

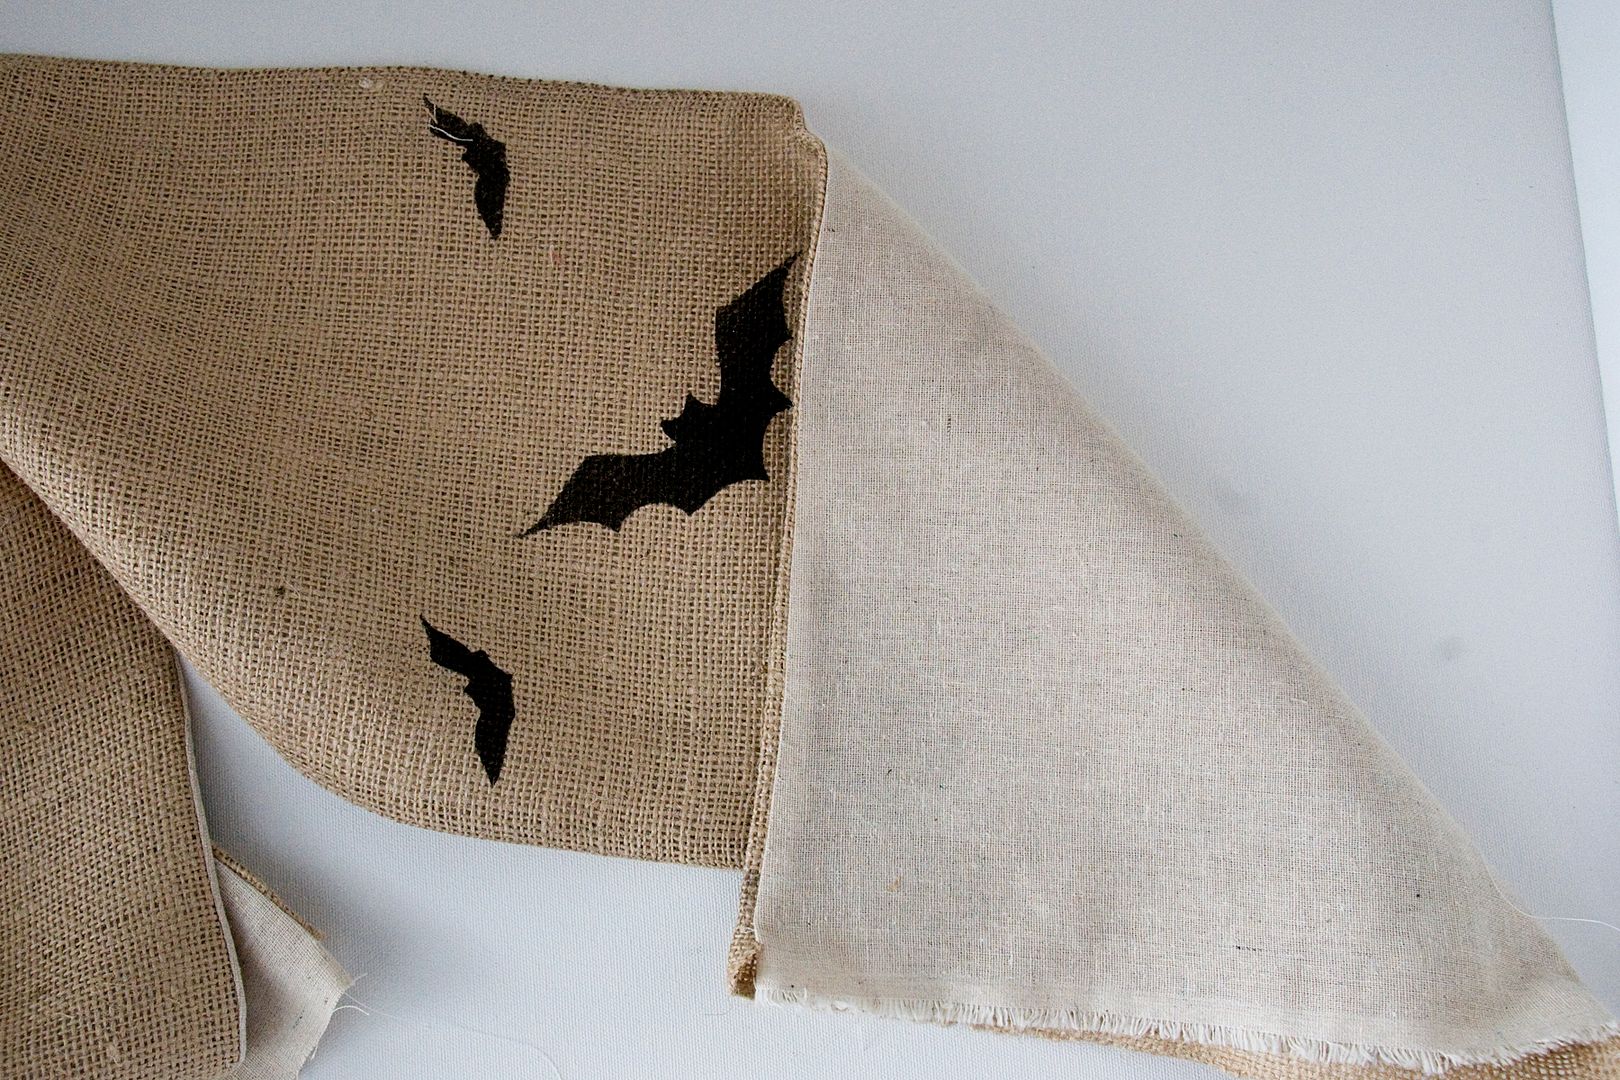
Next, place the runner and the runner lining together, right sides together and pin. The burlap will be bigger than the lining but that’s OKAY it’s supposed to be.

Stitch 1/2″ seam down both long sides of the runner, leaving the ends open.

Then trim excess burlap off, so that your seam allowance is even.

Turn the runner right side out and iron, design side down (the spray paint may stick to your iron) use a extra cloth on top of your ironing board to protect it.
Fold under the ends of the runner so that the raw edges are tucked in. Pin in place.  Cut a piece of trim to fit the runner ends and pin in place. 
Stitch trim in place so that it goes through trim and all layers of the runner.  Repeat for other side. If necessary put some fray check on the ends of your trim.
. . . . . . . . . . . . . . .
Thank you so much for joining us Melissa!! I am just loving your Spooky table runner!
Head over to the polkadot chair and check out all Melissa’s great projects. She has more Halloween fun to check out too!!
. . . . . . . . . . . . .
this post is sponsored by:
  • Bio
  • Latest Posts
Jamie

Jamie

Jamie

Latest posts by Jamie (see all)

  • Bird Feeders - May 24, 2019
  • [2014 WISHlists] Jamie’s List - December 12, 2014
  • Avery Custom Photo Gift Tags - December 2, 2014


15 Comments

« Today’s Guest: The Idea Room
{we have a winner} Jo Totes & Tea Collection »

Comments

  1. Marianne says

    September 4, 2011 at 2:38 pm

    I love this table runner and it looks so easy! I'll have to give it a try.

    Reply
  2. Ashley says

    September 4, 2011 at 3:22 pm

    how cute!! thanks for sharing =)

    Reply
  3. Lynsey says

    September 4, 2011 at 4:26 pm

    So cute! I wish I had a Cricut or Silhouette. 🙁 I wonder if someone close by has one I can borrow…

    Reply
  4. Suzanne says

    September 4, 2011 at 5:08 pm

    You have hit on yet another great project using burlap. Thanks!

    Reply
  5. Kristyn @ Good Gravy Crafts says

    September 4, 2011 at 5:39 pm

    Just love this, so many things you could do!! Do you have a cost on how much to make it?

    xx-Kristyn

    Reply
  6. Bri says

    September 4, 2011 at 9:09 pm

    This is super awesome!

    Reply
  7. Alifinale says

    September 4, 2011 at 10:17 pm

    Very cute. Quick question, do you have to spray paint it? I am just wondering if regular craft paint would work on the burlap.

    Reply
  8. Kimberly @ The Brown Eyes Have It says

    September 5, 2011 at 1:11 am

    That is so cool and spooky! I love it! I LOVE freezer paper painting, so much fun.

    Reply
  9. Mommyof2girlz/StephD says

    September 5, 2011 at 2:23 am

    Love this! Found you via The Polkadot Chair, love your blog!

    Reply
  10. Kinder Fun says

    September 5, 2011 at 3:24 am

    I just added your site to my top 10 blogs that I love.

    Mrs. Ayala’s Kinder FUN
    ❤Michelle

    Reply
  11. Kayla and Andrew says

    September 5, 2011 at 7:36 am

    The table runner is so cute! I'm definitely considering making one myself. :]

    Reply
  12. Charlene says

    September 5, 2011 at 1:26 pm

    this makes me wish I had a cricut or silhouette. wonder if I can still make a stencil of some sort and do this.

    Reply
  13. Wnderlnd says

    September 5, 2011 at 5:22 pm

    Thanks for the tutorial! I love all these ideas on how to use my SiL!

    Can you please share where you got the bookshelf/console table? I LOVE it!

    Reply
  14. ellie g says

    September 9, 2011 at 3:06 pm

    Melissa! I LOVE this! Especially the chandy. I am obsessed with those. And I pretty much want to get married to freezer paper. So this is right up my alley! It looks amazing on that table. What a great idea!

    Reply
  15. Stephanie Musleh says

    July 26, 2013 at 11:17 pm

    Melissa, was wondering what Cricut cartridge you used.

    Reply

Leave a Reply Cancel reply

Your email address will not be published. Required fields are marked *

This site uses Akismet to reduce spam. Learn how your comment data is processed.

Today’s Guest: The Polkadot Chair

Sep242010 posted by Jodie and Jen 12 Comments

Hi there!! My name is Melissa Mortenson and I have a blog named The Polkadot Chair, after a comfy chair that I have in my craft room. I love to create all kinds of things from crafts, and quilts to clothing and scrapbooks!  I have an etsy shop that I run with my best friend Traci.  Our shop is called May & Mae, we sell handmade jewelry, sewing kits, sewing patterns and anything else that is catching our eye at the time! I’d love for you to stop by and say “hi” sometime.

I’m so excited to be guest blogging here at eighteen 25. When they asked me I immediately started dreaming up ideas of what I could share. You know how you always take a million photos on Halloween day of everyone all dressed up in their adorable costumes?  Well I thought that it would be fun to find a way to actually display the photos instead of just having them tucked away in scrapbooks or sitting on your computer!

This is a little Halloween desktop countdown calendar! Today I’ll show you how to build the basic structure then you can embellish it as you like! You could use the same plans to make a flip book for almost any occasion, but I think it would be especially fun for Christmas!

To begin you will need:
– 2 pieces of 8″x8″ book board or VERY sturdy chipboard. I used 7gypsies black book board.
– 1 piece 8″x8″ card stock in co-ordinating color
– 1 piece 8″x8″ pattern paper
– 3, 2″ binder rings
– 10 photos, I printed mine in black and white and added some swirls in photoshop to a few of them before I printed them.

I also used the Close to My Heart All Sorts Mini album for the chipboard pages in the book, and a few colors of Glimmer Mist to make all of my supplies look more “spooky”.

You will also need various Halloween scrapbooking supplies.

Step 1: Take your 8″x8″ piece of cardstock and score it down the center. Then fold it in half.

Then on each end measure in 1″ and score and fold the opposite way you folded your center.

Next using some super sticky tape (I like the thin line orange tape) tape your 2 8″x8″ book board pieces to each of the 1″ flaps on the side. Secure WELL!

Next take your 8″x8″ piece of pattern paper and score it down the center. Fold it in half with the right side facing out. (I  used a punch to decorate the edges of this piece of pattern paper). Bring the 2 bookboard edges up so that you form a triangle.  Using sticky tape tape your pattern paper piece over the top of your book board.

It should look like this when you are done.

Next you will need to punch your holes. You will need a cropadile or some other heavy duty punch for this.
If you are using chipboard pieces with pre-punched holes use those as the guide for punching the holes in your base.
Now your base is finished and you are ready for the fun part!  Making your countdown pages and embellishing your project!

Here are photos of the 10 pages that I made. I wanted the calendar to have a very hodge podge feel, so none of my pages are the same size or color. I liked the layered look and being able to see some of the pages poking out from the sides.


I embellished the edge with a bit of black crepe paper


This paper had a white background before I added the glimmer mist


Just a note: Since this is a countdown calendar, I put the pages in reverse order, so page 10 is first, then 9 and so on.  Beginning at 10 days before Halloween you flip a page a day over, until you get to 1!
I hope you enjoy making one!
*****************
Thank you Melissa for such an awesome project! I love looking through Halloween pictures from past years and i think it is so fun to have them out and part of your decorations!
Head over to The Polkadot Chair and check out all the other great ideas Melissa has to share. There is always something fun and exciting happening over there!!

************
don’t forget today is the last day to enter the giveaway for a free project life kit from Becky Higgins!
here
  • Bio
  • Twitter
  • Facebook
  • Pinterest
  • Latest Posts
Jodie and Jen

Jodie and Jen

I'm Jen Sedillo, one of the bloggers behind Eighteen25. I love creating and crafting, reading good books, visiting new places and being with family!
Jodie and Jen

@eighteen25girls

Jodie and Jen
Jodie and Jen

Jodie and Jen

Jodie and Jen

Latest posts by Jodie and Jen (see all)

  • Our Friday Five 9.30 - September 30, 2022
  • Our Friday Five 12.3 - December 3, 2021
  • Composition Book Christmas Planner - November 28, 2021


12 Comments

« Today’s Project: Happy Halloween Tags
Halloween Links »

Comments

  1. Monika Wright says

    September 24, 2010 at 1:28 pm

    This is way too cute…I'm a sucker for countdown calendars anyway!

    Reply
  2. { kelly jo } says

    September 24, 2010 at 1:45 pm

    Oh, man- this is beyond cute!!!

    Reply
  3. Sandra says

    September 24, 2010 at 2:06 pm

    What a cute idea. I'm loving those jeweled hinge-clip rings. I searched this post to see if you mentioned them and even went to your Etsy shop to see if you sold them (which you don't but I LOVE the necklace charms!!!). Where oh where can a gal get some jeweled hinge-clip rings?

    Reply
  4. Suzanne says

    September 24, 2010 at 2:30 pm

    I love this cute, original idea. It's fabulous!

    Reply
  5. CraftyCat says

    September 24, 2010 at 4:13 pm

    Love it so clever!

    Reply
  6. Lain says

    September 24, 2010 at 6:58 pm

    Your photos are fabulous! Thanks for sharing. 🙂

    Reply
  7. Brooke says

    September 24, 2010 at 10:17 pm

    I LOVE your posts, you and your blogging friends have some amazing ideas!

    Reply
  8. Kristen Duke Photography says

    September 25, 2010 at 12:49 am

    LOVEthis!!!

    Reply
  9. Lindsayb-mo says

    September 25, 2010 at 5:18 am

    What a great idea! I'd never thought to do a Halloween countdown before. Super cute!!!

    Reply
  10. Lee says

    September 26, 2010 at 11:58 am

    way too cute! Thank you!
    lee
    butler83ataoldotcom

    Reply
  11. ellie g says

    September 27, 2010 at 5:54 am

    Oooooohhhh……The Polka Dot Chair…..definitely one of my favorite bloggers! And you can see why! What an amazing project. I LOVE the glittery elements, and the B&W photos!! The little circle numbers are awesome too (especially how the #5 one is that awesome dotty situation!) Another great project! I'm gonna be so sad when the month comes to an end!!

    Reply
  12. PeaceLoveApplesauce says

    September 27, 2010 at 4:28 pm

    Seriously, Love!!!

    Reply

Leave a Reply Cancel reply

Your email address will not be published. Required fields are marked *

This site uses Akismet to reduce spam. Learn how your comment data is processed.

welcome!

We are Jodie & Jen, born & raised in Vegas, in a little brick house. The number hammered onto our mailbox was 1825. Visit us often & be inspired to create a life you love. Read More…

  • Bloglovin
  • Facebook
  • Instagram
  • Pinterest
  • Twitter

Subscribe by Email

Get our latest & greatest posts straight to your inbox.

featured posts

Bird Feeders
Instant Pot BBQ Chicken Sliders
Free Printable Watercolor Notebook Covers
DIY Disney Ideas
Disney Trip Fun Bags
Printable Recipe Binder

eighteen25 loves

Disney banner 350

Privacy Policy

stay updated on latest
posts on Facebook

The Girls at Eighteen25
  • Bloglovin
  • Facebook
  • Instagram
  • Pinterest
  • Twitter

Copyright © 2025 · All rights reserved · Site by Melissa Rose Design