• About
  • Advertising
  • Contact
  • Meet the Team
  • Blog
    • Bloglovin
    • Facebook
    • Instagram
    • Pinterest
    • Twitter

Eighteen25

Create A Life You Love.

  • Home
  • Printables
  • DIY + Crafts
  • Holidays
  • Recipes
    • All Recipes
    • appetizers
    • salads/side dishes
    • main dishes
    • Desserts
  • Misc.

Today’s Guest: How Does She

Sep152011 posted by Jamie 14 Comments

One trip over to How Does She and you won’t be able to stay away. You’ll find a little bit of everything over there. And today, we are pretty excited to have Lara, one of the amazing How Does She girls, sharing a yummy recipe we are going to have to add to our October To-Do List. 
. . . . . . . . . . . . . . .
We are about to embark on a wild candy making ride!
This, my friends, is one recipe you HAVE to try out this Fall!
I remember making these delicious caramels every Halloween since I was a little girl.
Just for the record,… I don’t like black licorice at all.
This black licorice treat, however, is amazing.
Our neighbors would beg us for huge bags every Fall.
I even remember my friends mom hiding the entire bag so she,
and only she, could eat every last piece 😉
Get ready. After one bite… you won’t be able to stop eating!
Ingredients:
1 can sweetened condensed milk
2 cups sugar
1 cup butter
1/4 teaspoon salt
1 1/2 cups white corn syrup
1 teaspoon licorice or anise oil
1/2 teaspoon black paste food color
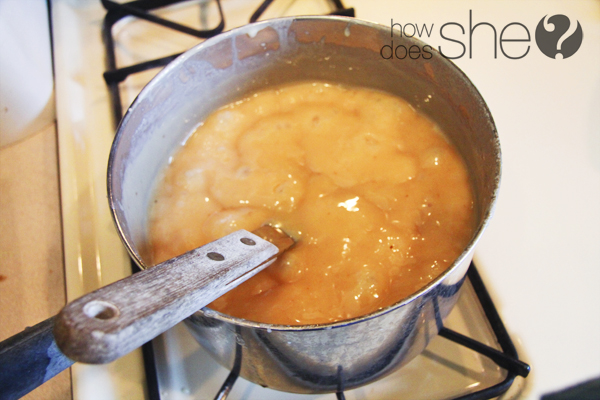
In a pot mix the first 5 ingredients together:
sweetened condensed milk, sugar, butter, salt, and corn syrup.
Cook and stir the mixture constantly over medium high heat. Use a heavy metal spoon or spatula to scrape the bottom of the pan while stirring, this will prevent it from burning on the bottom.
Cook until the caramel is to the soft ball stage or light brown. If you have a candy thermometer it will be done once it reaches 232 degrees.
*there will be little flecks of brown in the mixture, this is normal.
*If you don’t have a candy thermometer here is how to test if it is done:
Fill a cup with cold water. Spoon out some of the caramel mixture into the water. Squish it together with your fingers and let it cool down a bit in the water.
Remove it from the water, feel it, taste it and make sure it is set up enough. This is the consistency the caramel will be once it cools.
Once it is done cooking, remove from the heat and add the licorice or anise oil. Stir it through the mixture.
Next measure the black paste food coloring, stir it through the caramel.
Stir till the mixture is black all the way through.
Butter a 9 x 13 pan (don’t miss any spots, we want this to come out after it sets up).
Pour the caramel mixture in the pan. Do not scrape the bottom and sides out, there is usually a bit of sugar residue that you don’t want to crystallize in your caramels.
Set aside and let it cool.
When it is firm and cooled completely loosen with a spatula and place on a buttered counter.
Tear a piece of waxed paper and place over the slab of caramel.
Cutting on top of the paper and this will prevent the caramel from sticking to your knife.
Cut the pieces into 1 inch wide strips.
Go back over the strips with the waxed paper and cut them into 1 inch squares.
Separate the caramels after cutting, if you pile them on top of each other they will stick together.
Tear pieces of waxed paper about 4 1/2 inches wide.
Lay the strips on top of each other and cut in thirds.
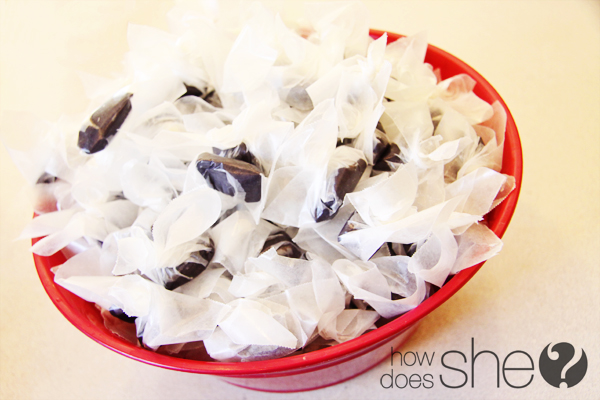
Place the caramel square in the center of the waxed paper piece.
Pull two opposite corners together and pinch.
With the other hand twist the caramel.
This will create a nice little wrapped piece of caramel.
This was my favorite part when I was a kid. My mom would gather all of us and have us wrap while she would cut.. and we would wrap as fast as she was cutting. So get those kids and put them to work! It’s a fun family activity!
There you have it! Package them up and share them with friends.. or keep them all for yourself 😉
I wouldn’t blame you.. they’re delicious!

This creamy licorice caramel treat will be a hit that the whole family will look forward to every year!
I Promise.

  • Bio
  • Latest Posts
Jamie

Jamie

Jamie

Latest posts by Jamie (see all)

  • Bird Feeders - May 24, 2019
  • [2014 WISHlists] Jamie’s List - December 12, 2014
  • Avery Custom Photo Gift Tags - December 2, 2014


14 Comments

« {subway art} halloween
come and see us! »

Comments

  1. Sandie says

    September 15, 2011 at 1:08 pm

    MMMMMMM I actually love black licorice. This looks amazing.

    Reply
  2. melody says

    September 15, 2011 at 2:21 pm

    Even though its black licorice, I am going to make this!! Thanks ladies!!!

    Reply
  3. Anathalia says

    September 15, 2011 at 3:45 pm

    That's mouth watering! I'll definitely try to make this on the weekend! Can't wait! And if it works, my Halloween treats might be homemade this year! 🙂

    Reply
  4. Susan R says

    September 15, 2011 at 3:45 pm

    Yum! I'm a black licorice fan, but my family hates it. That suits me just fine because it's the one treat that I know I'll get every last piece of if we ever have it.
    I make caramels every year, so I'll try these.

    Reply
  5. Denise says

    September 15, 2011 at 5:52 pm

    I love black licorice and so does my mom. I think I will surprise her and make her a batch!

    Reply
  6. A Cup of Sparkle says

    September 15, 2011 at 10:16 pm

    Yum. My husband would love this. I have to try it out!!!
    -Melike

    Reply
  7. Anonymous says

    September 16, 2011 at 12:13 am

    i can't wait to give them a try!!

    Reply
  8. twilightlaf@yahoo.com says

    September 16, 2011 at 2:39 pm

    I love, love, love this little treat!!! I have only found one gas station in the middle of no where Wyoming that always has it in stock, now I can make my own.

    Reply
  9. GrannyAnn says

    September 16, 2011 at 5:45 pm

    You have so many cute sights but some of your printed words are so light that I can't read them. Especially the labels.

    Reply
  10. Kamille says

    October 13, 2011 at 3:35 am

    Do you prefer anise oil? I noticed you used it in the photo. Does it really make that big of a difference? I'm getting ready to make this for my Dad who has cancer and can eat very little because of the sores in his mouth caused by chemo. He LOVES black licorice and will be thrilled to get this! Thanks for the idea.

    Reply
  11. Tanya Frost says

    October 31, 2011 at 1:35 pm

    So, I pinned this and made them! I love them and so does my daughter(who isnt a fan of licorice). Yummy, yummy! I brought them all to work because there are tons and I will eat them all!
    Thanks for the detailed instructions.

    PS – My dentist says thanks too!

    Reply
  12. Tanya Frost says

    November 26, 2011 at 9:46 pm

    So, I'm back after making another successful batch. This time I used Butter Rum oil and they are amazing! These are going to be my go to Christmas gift. I'm on to Spearmint and Amaretto next!

    Reply
  13. Sweet Marie says

    February 20, 2012 at 8:28 am

    Oh my, these sound amazing! I must try these, I made a gluten free lifestyle decision and have missed black licorice so much. Anise tea just doesn't cut it. Thanks so much!

    Reply
  14. the medeiros family says

    December 10, 2014 at 3:56 am

    Do you know if this would work with Anise extract or does it need to be the oil? Thanks….

    Reply

Leave a Reply Cancel reply

Your email address will not be published. Required fields are marked *

This site uses Akismet to reduce spam. Learn how your comment data is processed.

Today’s Guest: How Does She?

Sep22010 posted by Jodie and Jen 17 Comments

Today we are super excited to share a project by Missy from the blog How Does She?

If you haven’t visited their blog yet, head on over!

They sew, they work with wood, they throw great parties, they do just about everything!!

and they do it well!
You’re going to LOVE all the great stuff you’ll find there.
************

SpOOky BOO bags

You can make these fun spOOky bags and fill them with treats for your kid’s school teacher, the bus driver, the music teacher, the secretary, the principal, your boss, your friend…whoever! or use them for… SPOOKING YOUR NEIGHBORS! You have all probably been booed in your neighborhood in the month of October. If not, click here to read about how to do it. Now you can make these festive bags that are perfect for filling with treats and traveling around the neighborhood! You can just hang it right on your neighbor’s doorknob.

Ring and RUN!

My kids love this tradition because they get the thrill of being sneaky, and the adrenalin rush that goes with it! For this project you will need: -a pair of scissors -3 pieces of felt for each bag -additional felt for the faces -heat and bond -various colors of thread (thicker is better, but not necessary) -a sewing machine (If you don’t have a sewing machine, the pumpkin was actually done by hand with a blanket stitch.)
I even put together a FREE printable pattern for you! Click here to get it!
The pattern is for the bag and also for the faces of the cat and ghost. For other ideas, Pottery Barn Kids has some similar bags and you might find some inspiration:) Trace the squares onto the felt,

Cut them out

iron them onto the same sized heat and bond pieces,

trace shapes on the back of the heat and bond paper,

cut out the shapes, and before you iron them onto the front of the bag, draw and sew your mouth on with a zig zag stitch. After sewing, if you didn’t cover your pencil lines perfectly, just flip your felt over and…

line is GONE!  🙂


Now line up your pieces,

and sew them all together to form your bag.

I did the biggest zig-zag I had. You’ll want to start a quarter inch down, and use the presser foot to guide you. I wouldn’t go any closer to the edge than the width of the presser foot, I tried it and it wasn’t pretty! Once everything is sewn, hand stitch the handles on,

and you’re done!
Now for the fun part…teaching your kids the best methods for door bell ditching 🙂
Thanks for having me! I am SO THRILLED to be posting on one of my FAVORITE blogs!
I love eighteen25!
I can’t wait to see all the CREATIVE halloween ideas this month – what a fun idea!
  • Bio
  • Twitter
  • Facebook
  • Pinterest
  • Latest Posts
Jodie and Jen

Jodie and Jen

I'm Jen Sedillo, one of the bloggers behind Eighteen25. I love creating and crafting, reading good books, visiting new places and being with family!
Jodie and Jen

@eighteen25girls

Jodie and Jen
Jodie and Jen

Jodie and Jen

Jodie and Jen

Latest posts by Jodie and Jen (see all)

  • Our Friday Five 9.30 - September 30, 2022
  • Our Friday Five 12.3 - December 3, 2021
  • Composition Book Christmas Planner - November 28, 2021


17 Comments

« Today’s Guest: Tatertots & Jello
Today’s Guest: Jen Johnson »

Comments

  1. Susan Crabtree says

    September 2, 2010 at 1:08 pm

    these are so cute-I wish I could sew!

    Reply
  2. Brenda says

    September 2, 2010 at 1:14 pm

    Adorable! I love how simple they are to make! Thanks for sharing!
    Happy September!

    Reply
  3. Lisa Anne says

    September 2, 2010 at 1:58 pm

    OHHH my new favorite blog!! I love all of these arts and crafts. I love this boo bag. Last year I made so many crafts for halloween including trick or treat bags for the kids. I'm so excited I found you all and hope to be creating new crafts again soon. I've been so busy and in a craft rut!

    Reply
  4. Jen @ tatertotsandjello.com says

    September 2, 2010 at 2:09 pm

    Sooo cute Missy! I love those bags. They are so fun. I am excited to make some and start doorbell ditching 🙂

    xoxo
    Jen

    Reply
  5. The Vaughn Family says

    September 2, 2010 at 3:12 pm

    Oh. My. Word. I just found your blog and I am already OBSESSED! I cannot wait to start using all of your fun downloads, I love every single one of them! Way to go and can't wait to read more!

    Reply
  6. Just JaiCi's Crafts says

    September 2, 2010 at 3:31 pm

    I cannot wait to make these!!! Halloween is BIG at our house 🙂

    Reply
  7. Natalie@Endless Crafting says

    September 2, 2010 at 5:02 pm

    We love the "BOO"ing our neighbors!I love the idea of putting the bags on the doorknob. So cute and easy too!

    Reply
  8. Mormishmom says

    September 2, 2010 at 5:22 pm

    These are super fantastic! I'm so glad she shared a tutorial!

    Reply
  9. IndieSpotting says

    September 2, 2010 at 6:04 pm

    Those are positively adorable! What a great idea.

    Reply
  10. Christene from WhipperBerry.com says

    September 2, 2010 at 6:57 pm

    What a CUTE tutorial for a fun gift for fall! Thanks so much for sharing it!

    Reply
  11. ellie g says

    September 2, 2010 at 8:11 pm

    HELLO?? Those are so stinkin' cute. I adore the orange stitching on the black felt. And the ghost face is amazing! (plus that VERY insightful tip)

    Well, I'm just trying to justify making 12 of theses. But 'cept how we NEVER get "boo-ed" because our house is on a really main road, right next to a street light. And we have a glass front door. Mission Impossible. (at least that's what I tell myself. Otherwise it's because people hate us. And while that might be true, it's just sad.)

    What else can I use these for??

    Seriously. SO CUTE!

    Reply
  12. The Bonjour Four says

    September 2, 2010 at 8:59 pm

    i sure am loving these tutorials!! more please… 🙂

    Reply
  13. Ming says

    September 2, 2010 at 9:14 pm

    Darling bags!And who doesn't love doorbell ditching?! 🙂

    Reply
  14. Em and Tom says

    September 3, 2010 at 12:14 am

    These are darling! I want to make them for all my neighbors! What a fun, fast, and fantastic craft!

    Reply
  15. Chocolate Mousie says

    September 3, 2010 at 2:35 am

    These are too darn cute! Can these be done using stitch witchery? I can't sew!

    Reply
  16. theyoung8 says

    September 3, 2010 at 12:47 pm

    I love these bags! We "boo" our neighbors every year, but always with the bags they sell at Hallmark…this is SO MUCH CUTER! Thank you so much for the idea!

    Reply
  17. dragonflydreamer says

    September 3, 2010 at 1:46 pm

    These bags are sooo cute! I have a 3 yr. old nephew and 2 yr. old twin nieces who would love these. I am going to try my hand at making these. Thank you so much for sharing such an adorable project.

    xo Susi xo

    Reply

Leave a Reply Cancel reply

Your email address will not be published. Required fields are marked *

This site uses Akismet to reduce spam. Learn how your comment data is processed.

welcome!

We are Jodie & Jen, born & raised in Vegas, in a little brick house. The number hammered onto our mailbox was 1825. Visit us often & be inspired to create a life you love. Read More…

  • Bloglovin
  • Facebook
  • Instagram
  • Pinterest
  • Twitter

Subscribe by Email

Get our latest & greatest posts straight to your inbox.

featured posts

Bird Feeders
Instant Pot BBQ Chicken Sliders
Free Printable Watercolor Notebook Covers
DIY Disney Ideas
Disney Trip Fun Bags
Printable Recipe Binder

eighteen25 loves

Disney banner 350

Privacy Policy

stay updated on latest
posts on Facebook

The Girls at Eighteen25
  • Bloglovin
  • Facebook
  • Instagram
  • Pinterest
  • Twitter

Copyright © 2025 · All rights reserved · Site by Melissa Rose Design