Hello again!
Are you ready to learn all about raw? Gosh I love shooting in this format. It’s flexible and gives you a range of control that shooting in JPEG does not.
Ok, your first step is to delve into your camera’s menu – before you begin taking photos, you have a couple of choices. One of which is the kind of format (“image quality” in most cameras), that you are going to use. Different cameras have different menus, but most should have the choices of shooting in jpeg or raw (or both!). Consult your camera’s instruction manual if you don’t know how to get to these settings – my manual was my best friend when I first got my camera!
Let’s talk about the basics…
A jpeg is a processed image. What you see is the “final” image. This doesn’t mean you can’t edit the photo, but what’s done is done and the edits won’t look as good. Most point and shoot cameras only offer this format, and most DSLR’s offer both this and raw.
A raw image is unprocessed. It is not the “final” image. The technicalities are actually pretty neat to learn about, but all you have to know right now is that you can make choices in processing after you take the photo. Pretty cool, huh?
I like to use this comparison when it comes to raw vs. jpeg… Let’s say you are baking cookies. You’re done and you have the already-baked cookie in your hand. You decide it needs to be sweeter, so you sprinkle sugar over the top. Do you think that would really do the trick? That would obviously be the jpeg comparison. The raw version would be putting more sugar in the dough before it’s baked. Make sense? I’m certainly not the most talented in the kitchen, but even I know that it would turn out a lot better! If you decide that your raw image needs to be a bit brighter, that edit is going to look a LOT better than if you were making those adjustments to a jpeg.
Of course nothing makes up for getting the exposure right in camera, but the great thing about shooting in raw, is that it’s more forgivable if you don’t get your settings absolutely spot on. And let’s face it… who has their settings perfect 100% of the time? So take comfort in knowing that if you slightly under or over expose your image, you can “save” it. Hallelujah!
There are other really neat features, too, such as isolating a single color, getting the white balance perfect (trust me – if for no other reason, do it for that!), and any and all basic edits look SO much better than if you were to do the same on a jpeg.
Lets get into the process of how to do this. First of all, you need software that can open your raw file. Many people use the Adobe Camera Raw converter that is included with Photoshop and Photoshop Elements. Once your raw file is opened, you are able to make basic adjustments. There aren’t any bells and whistles in this part, but the basic edits (white balance, tint, exposure, recovery, brightness, contrast, etc.) look a LOT better than they would if you were doing those same adjustments to a jpeg. Once you complete your adjustments and you click “done” or “open image,” the program actually opens it up as a jpeg! Now you can do a ton of different things in Photoshop. You’ve fine tuned it yourself and it’s the best jpeg it can possibly be.
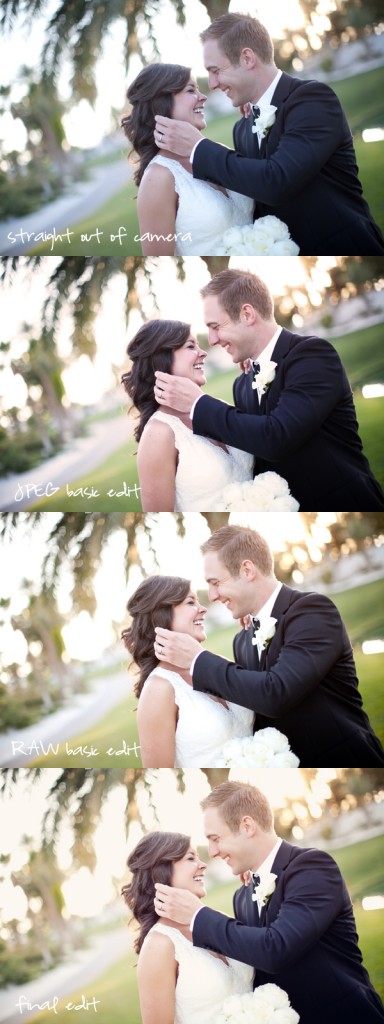
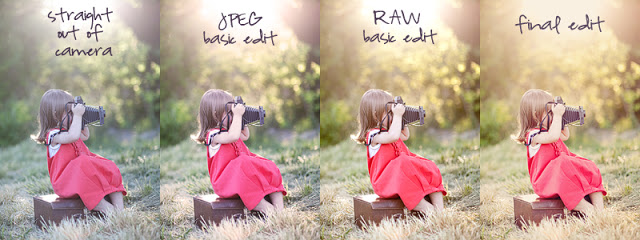
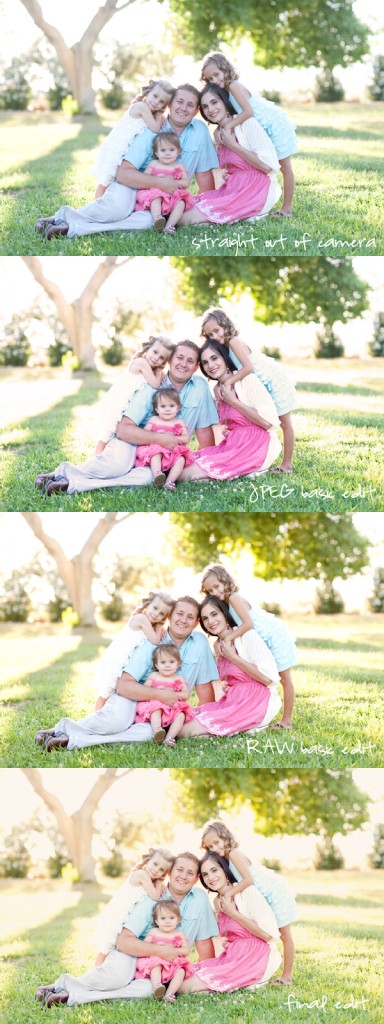
I have examples below of three different photos. You can see my straight out of camera shots (I underexpose slightly for my personal post-processing style). The middle two are the same exact edits done in jpeg and in raw. Notice how “muddy” the jpeg edit is? That edit is flat, slightly discolored, and the details start to disappear more (notice the groom’s jacket). The differences are even more noticeable when the photo is too light or dark, or if the white balance is off. It is VERY hard to edit a jpeg under those circumstances. The very last photo in the collage is the final image, used from the raw basic edit. It is complete with retouching and a slight color shift.
All in all, raw is an amazing format. Especially if you’re an imperfect photographer, which is certainly why I love it! Yes it does involve an extra step, but to me it is worth it in the end. I am able to practically customize the image I’m working on so it turns out to be the best photo it can possibly be.
One last thing… if you don’t feel comfortable shooting exclusively in raw just yet, your camera most likely has a raw+jpeg option. Each photo will take up a lot more room on your memory card, but that’s certainly not a deal-breaker! It’s worth it to buy a few extra memory cards and/or external hard drive. Shoot in both so that you can play with raw for a while. And have fun in the process! That’s what it’s all about :).
See you next month! We’ll talk about cropping. Believe it or not, it’s actually a pretty cool topic ;).
. . . .
We are so excited to have
Jeanna
here sharing
photography tips
and
lessons with us on eighteen25!
For more information about
Jeanna
or to see more
of her beautiful work
be sure to stop by Jeanna Hayes
Studios.
. . . . . . .
this post is sponsored by:


Oh my goodness. This was so informative and perfect for the new photographer – me! Thank you for teaching 🙂
I love taking photos and this tips are sure helpful. Love the finish look of those photos. Got my eye on your blog now.
Thanks so much for posting this. You have made RAW easy to understand and why it is so good. I am now game to try and use this 🙂
maybe you can help…if I want to shoot raw and open in light room first to do basic edits there and then do final edits in elements how do go about doing that?
I love shooting in RAW, this is a great explanation!
This is great info! I've been scared to make the jump to RAW. But I use Lightroom to edit. Is it still just as important to shoot in RAW when editing in Lightroom rather than Photoshop? Thanks so much for the tutorial!
Thanks for the kind words! I always hope the way I explain things make sense to other people, as opposed to just ME! ha!
Anonymous – You can totally edit in Lightroom first and do those edits there. I do my batch editing that way, in fact. The LR edits look great. Just import them into LR, make your edits, then export as a jpeg. From there you can pull those up in Photoshop and do whatever else you need to do. Good luck!
Kellie – It is extra important to shoot in raw when you do Lightroom edits! 🙂 One time I was editing a wedding and somehow I had accidentally started shooting jpegs instead of raw for about 20 photos. I didn't notice until I was editing in LR, because the batch edits I had been doing suddenly looked awful! So yes, definitely still shoot in raw :).
Great! Thank you so much!