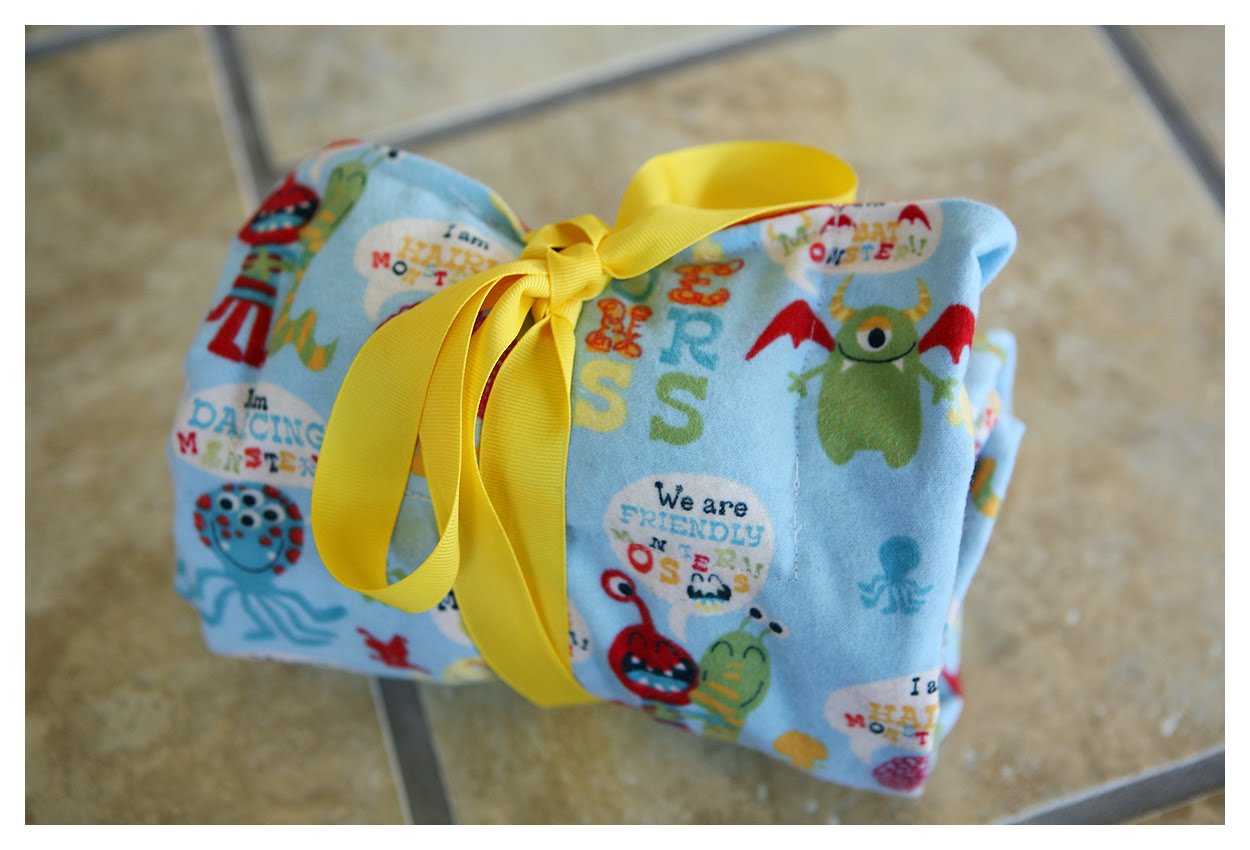
have you ever seen one of these puppies?
it is called a carseat cooler. it is, in my opinion, one of the greatest creations known to moms. right up there next to my 9 month old’s sound machine.
do your kids shriek when you put them in the car after a day in the hot, hot sun? mine did (vegas heat, ya know?) until i was introduced to this little lifesaver.
if you can sew a straight line…you too can save the bums of your babies and tots!
here’s what you need…
1 1/2 yards of printed flannel (will make 2 coolers)
1 1/2 yards of coordinating flannel
1/4 yard fabric for pockets (you can also use scraps)
3/4 inch velcro (not the kind that is sticky on the back)
1 c. rice
thread
scissors
measuring tape
matching ribbon
6 reusable ice packs
alright…let’s begin
1. cut 2 (one in your printed flannel and one in your coordinating) 48″ X 17″ pieces.

2. sew those pieces together (cute sides together) leaving a 6 1/2 ” gap, centered at one end.
3. pull right side out and press.
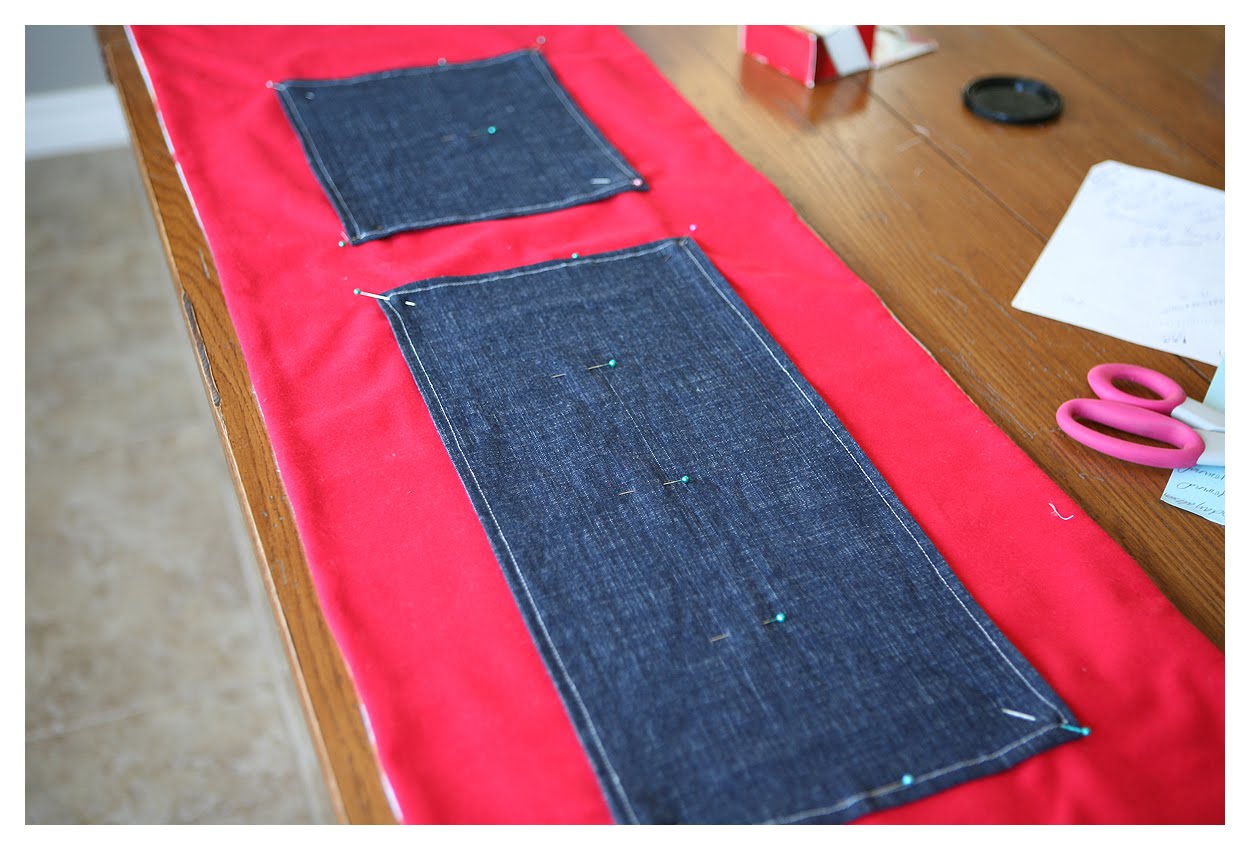
4. cut out of your scraps, 1 piece 11″ X 9 1/2″ and 1 piece 19″ X 9 1/2″.
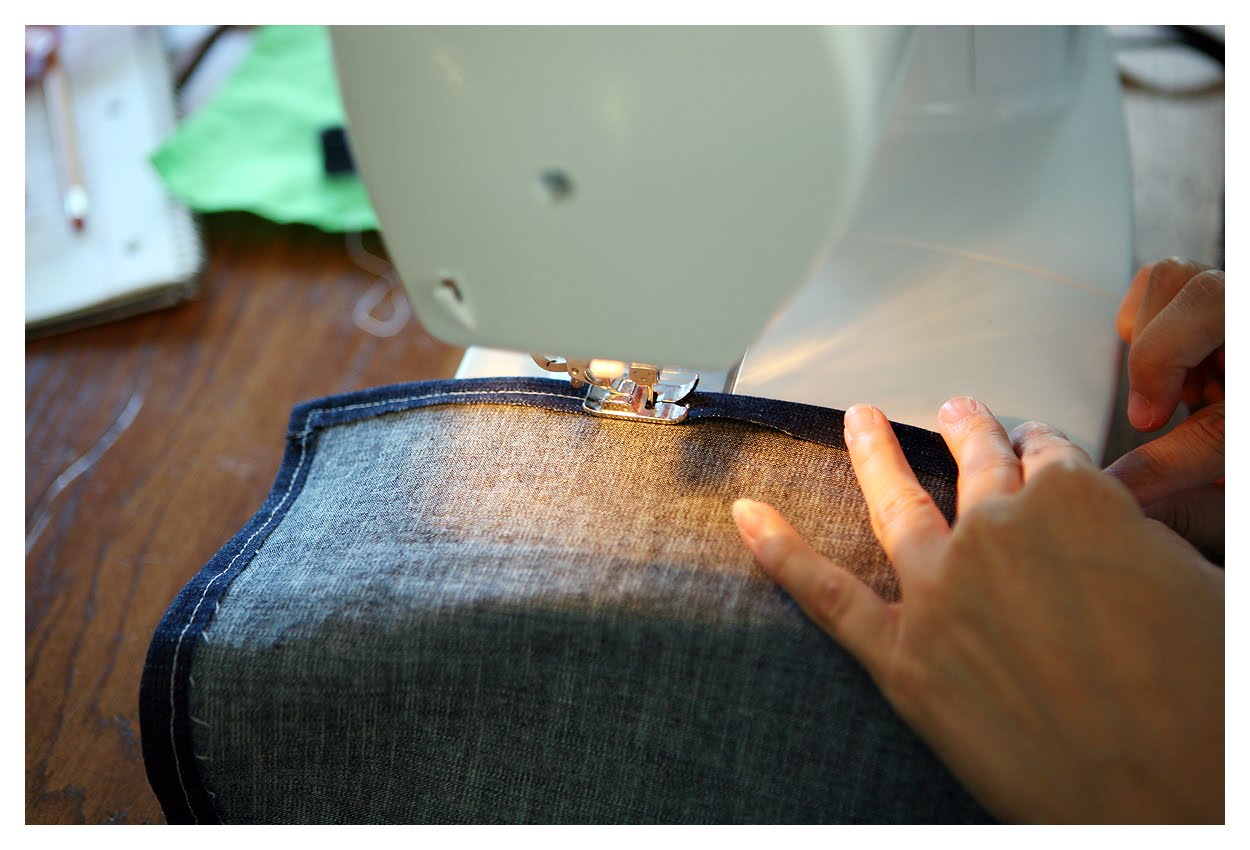
5. fold ends in 1/4″ and press.
6. sew all the way around.
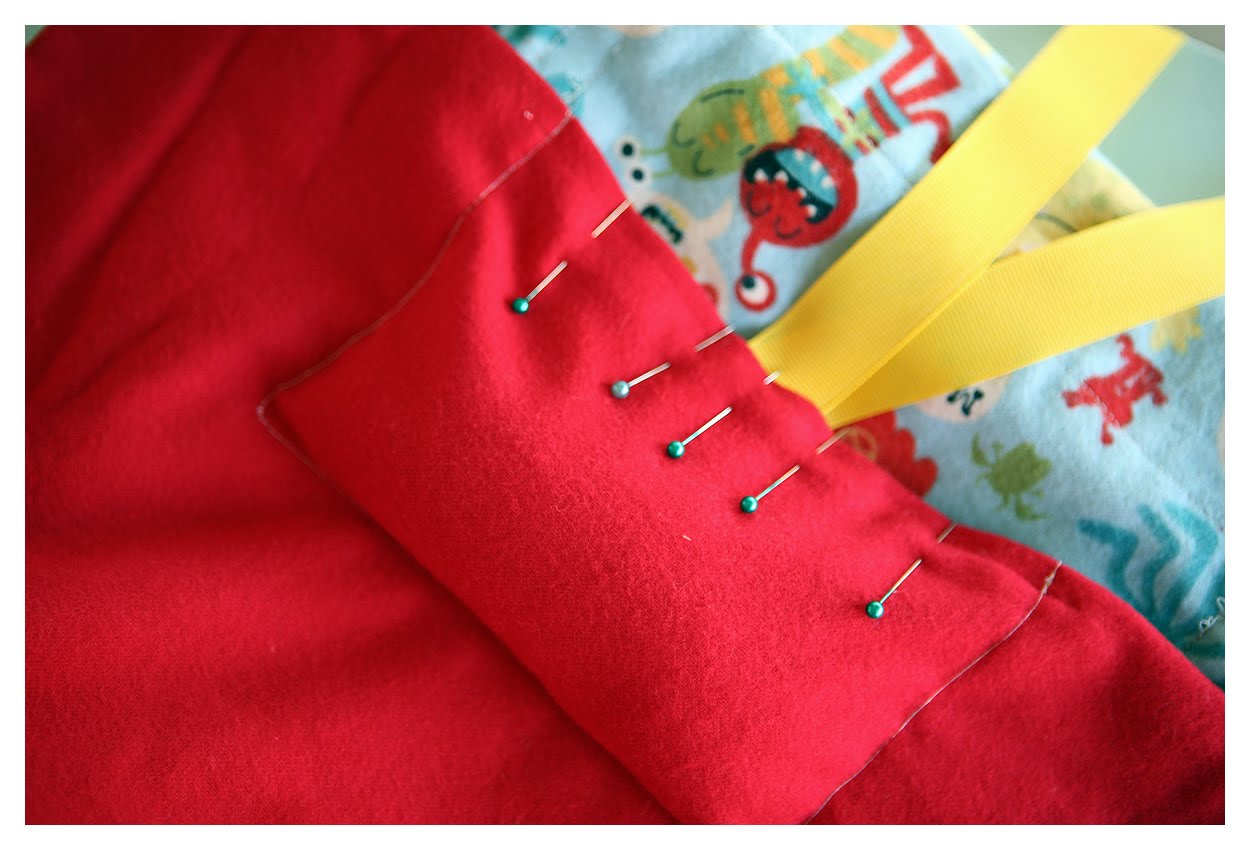
7. pin your pockets on your fabric. small pocket goes 6 1/2″ inches from bottom. large pocket goes aprox. 9″ from the top (this end should have your opening).
8. attach your velcro by pinning at the top of your pocket and pinning to your flannel. i placed pins on my flannel at the top of where my pockets laid, then i knew to put that velcro under my pins.
9. sew on all your velcro.
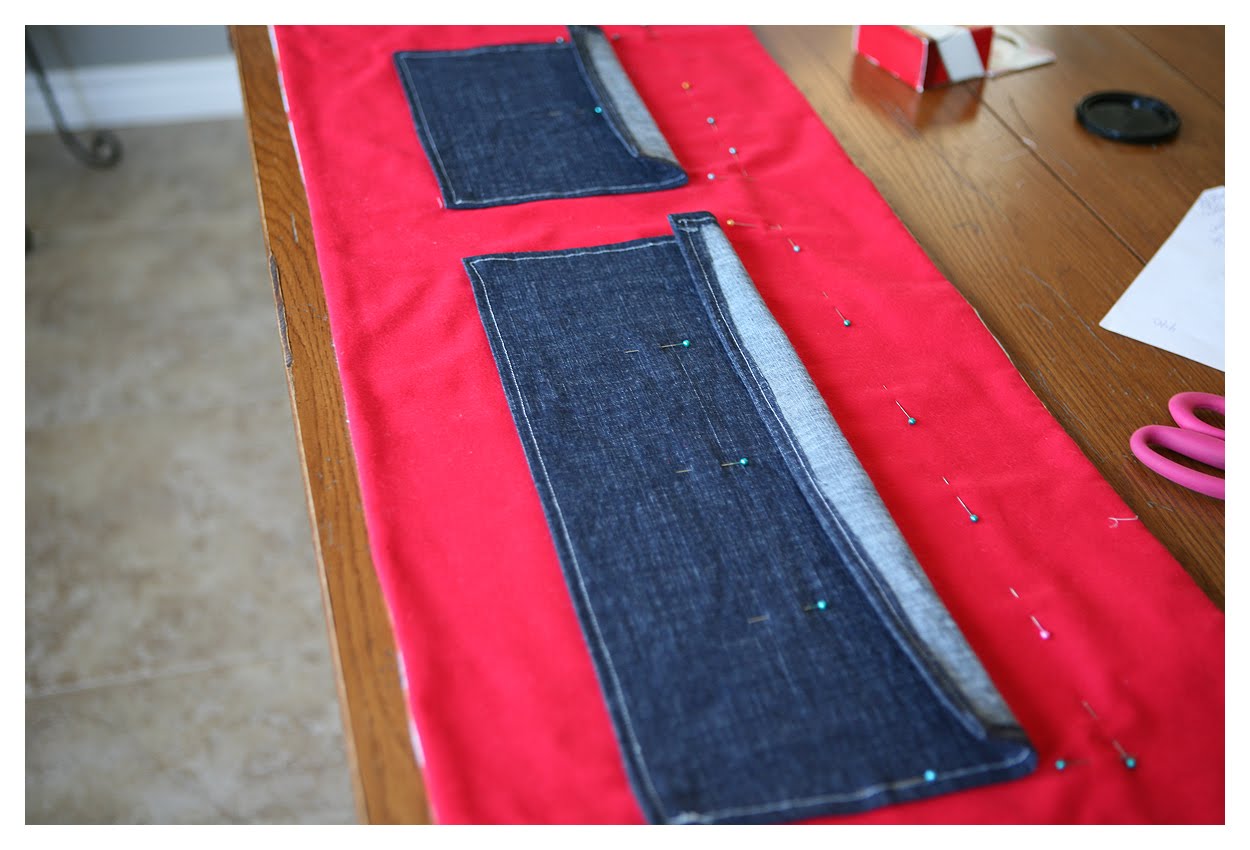
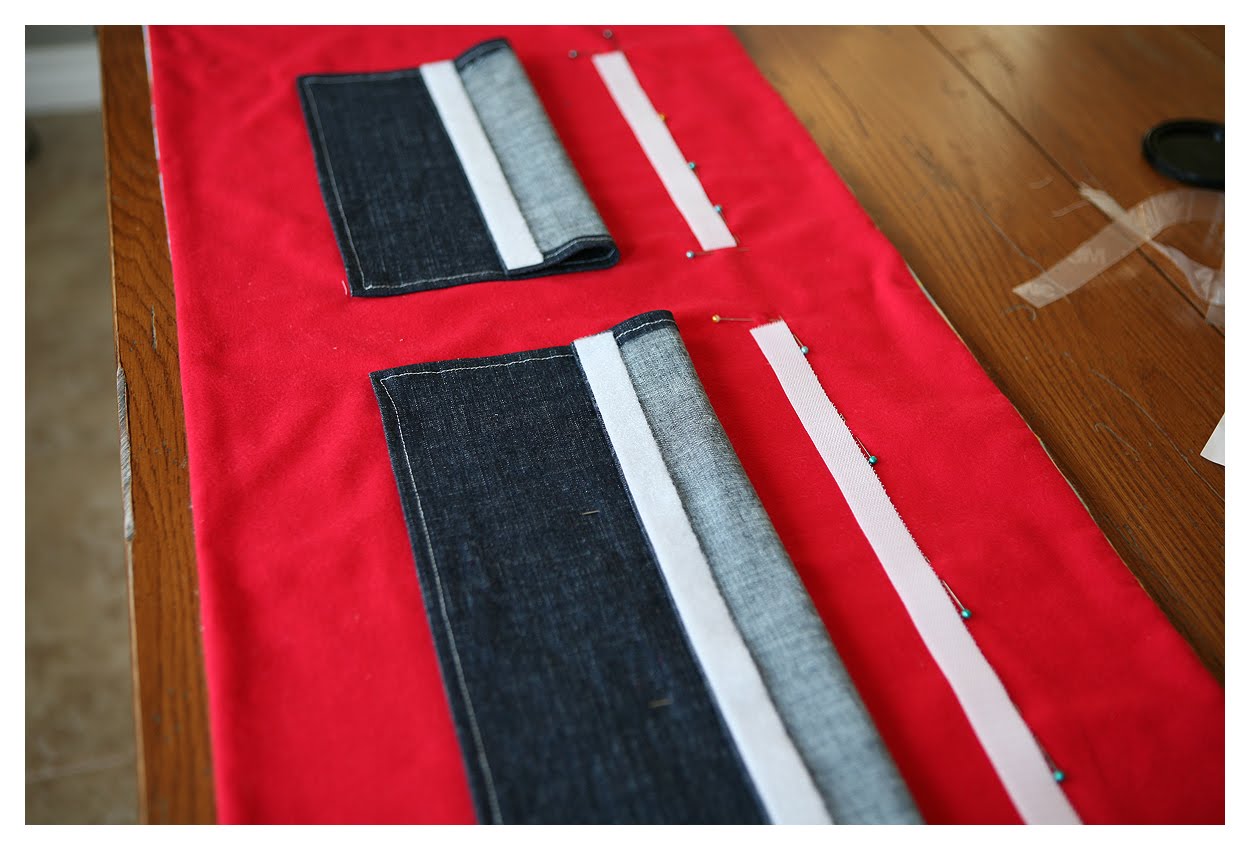
10. now, lets make the pockets. pin aprox. (they are not going to be exactly equal) 5″ in on the first (small)pocket (i pinned one at the top, in the middle and at the bottom) and 4 1/4″ to 4 1/2″ (large) on the second pocket.
11. sew your lines starting at the top of your velcro and ending at the bottom of your pocket fabric.
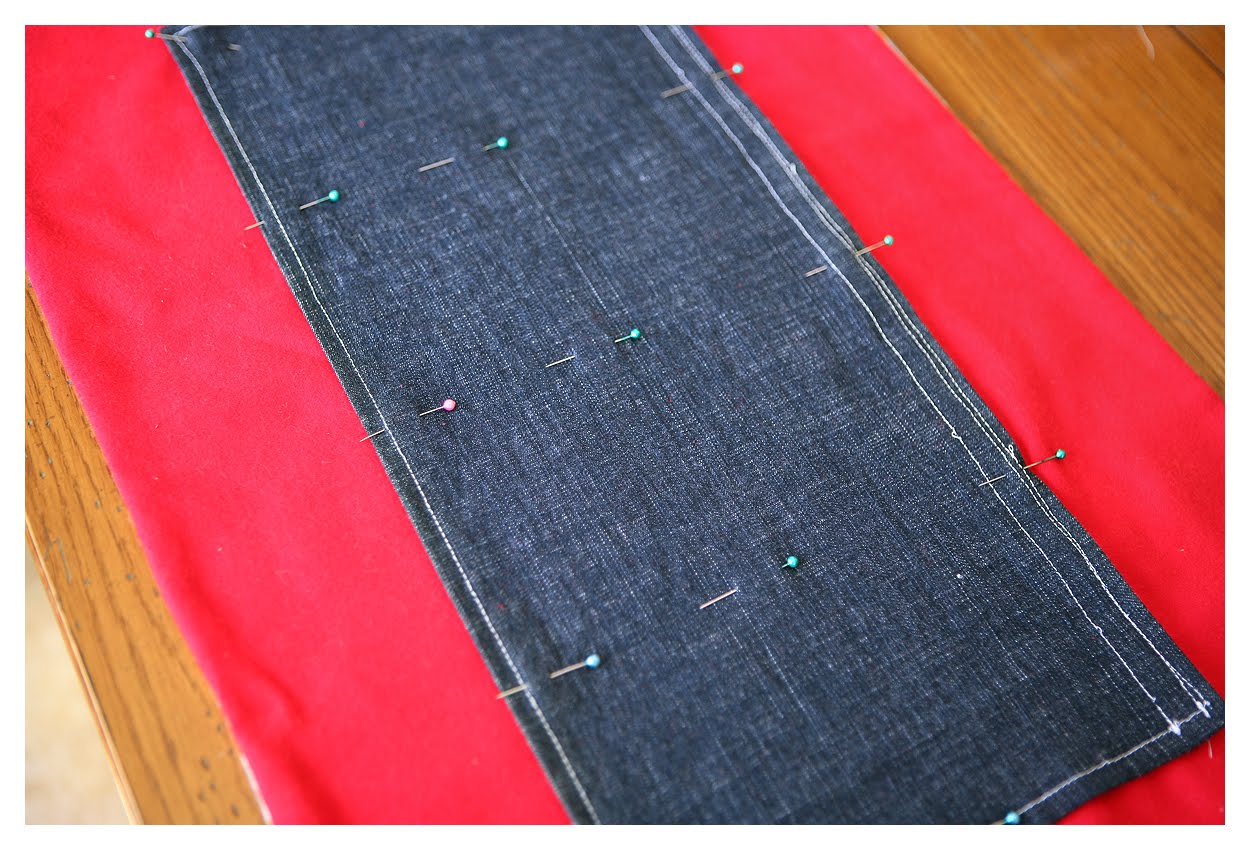
12. this next pouch will hold rice to keep the cooler from falling down while in the carseat.
i placed pins aprox. 4 3/4″ in and down aprox. 4 1/4″. These measurements will depend on where you left your opening.

13. sew your pouch, still leaving the top open.

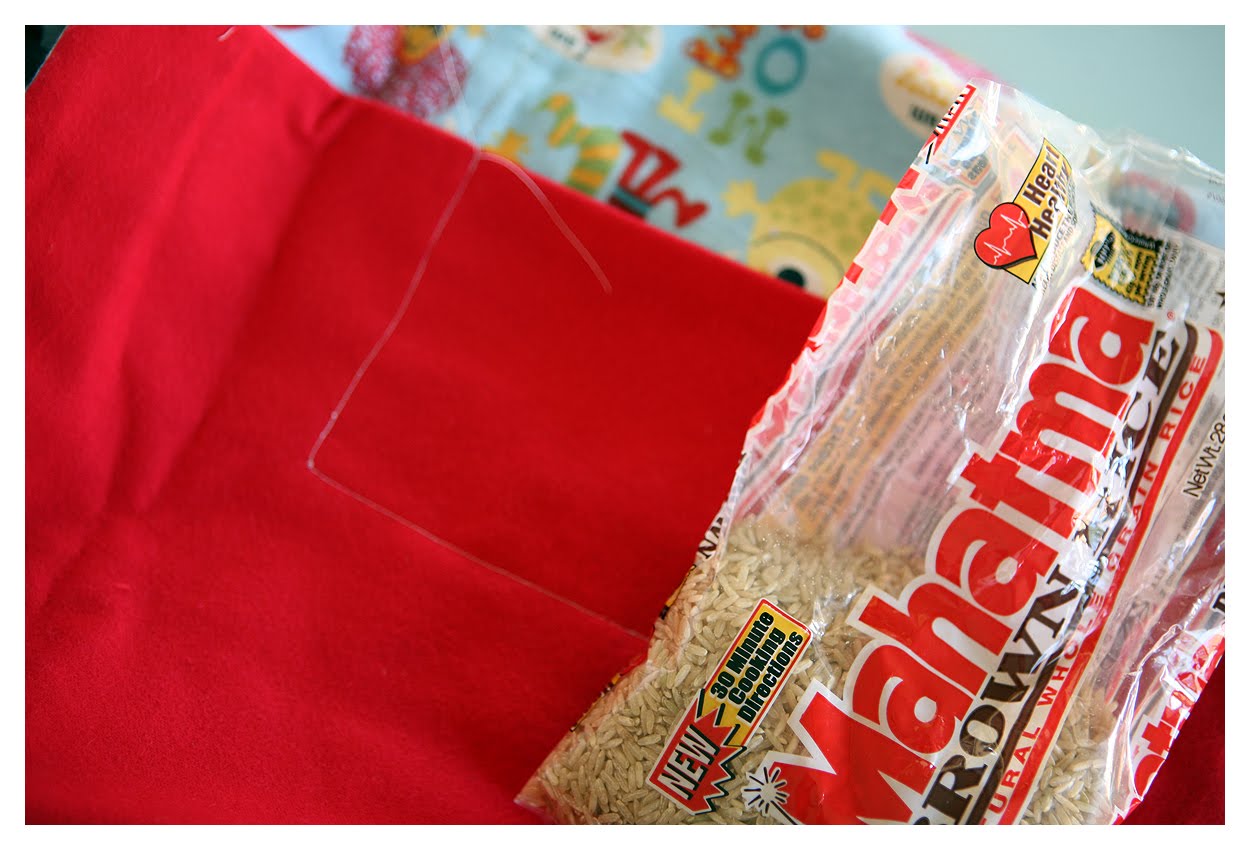
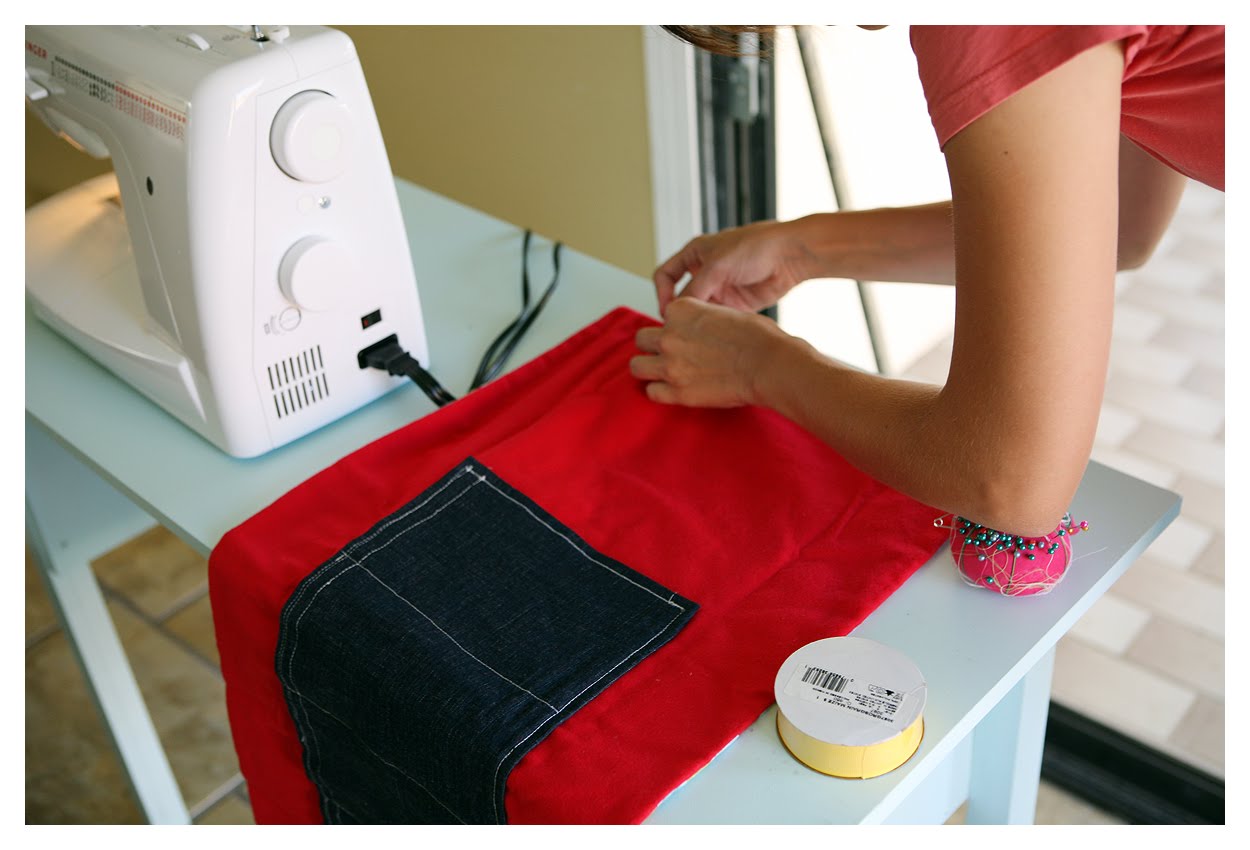
14. fill your pouch with rice (about a cup) and pin your top closed (leaving a small opening for your ribbon).
15. insert 2 pieces of ribbon 1 about 35″ and the other about 26″. sew the top closed.
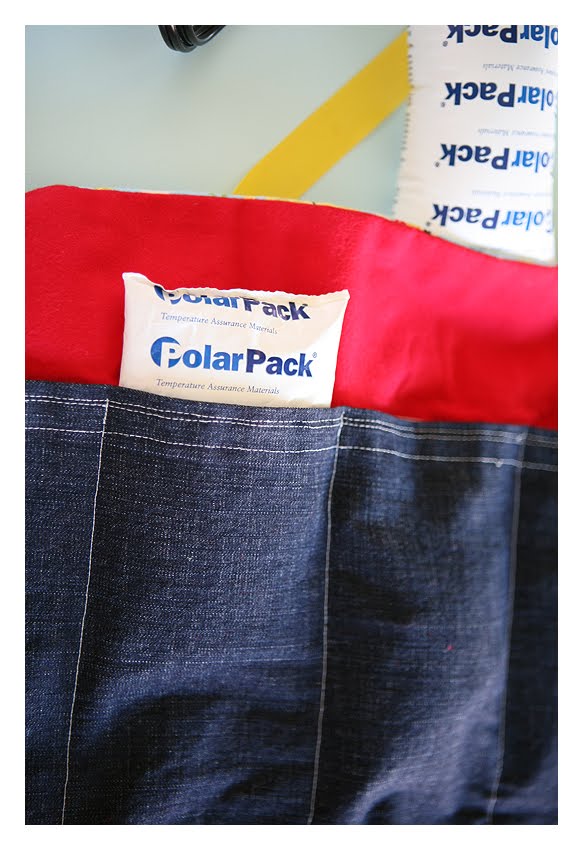
16. now, place your frozen ice packs in the pockets.
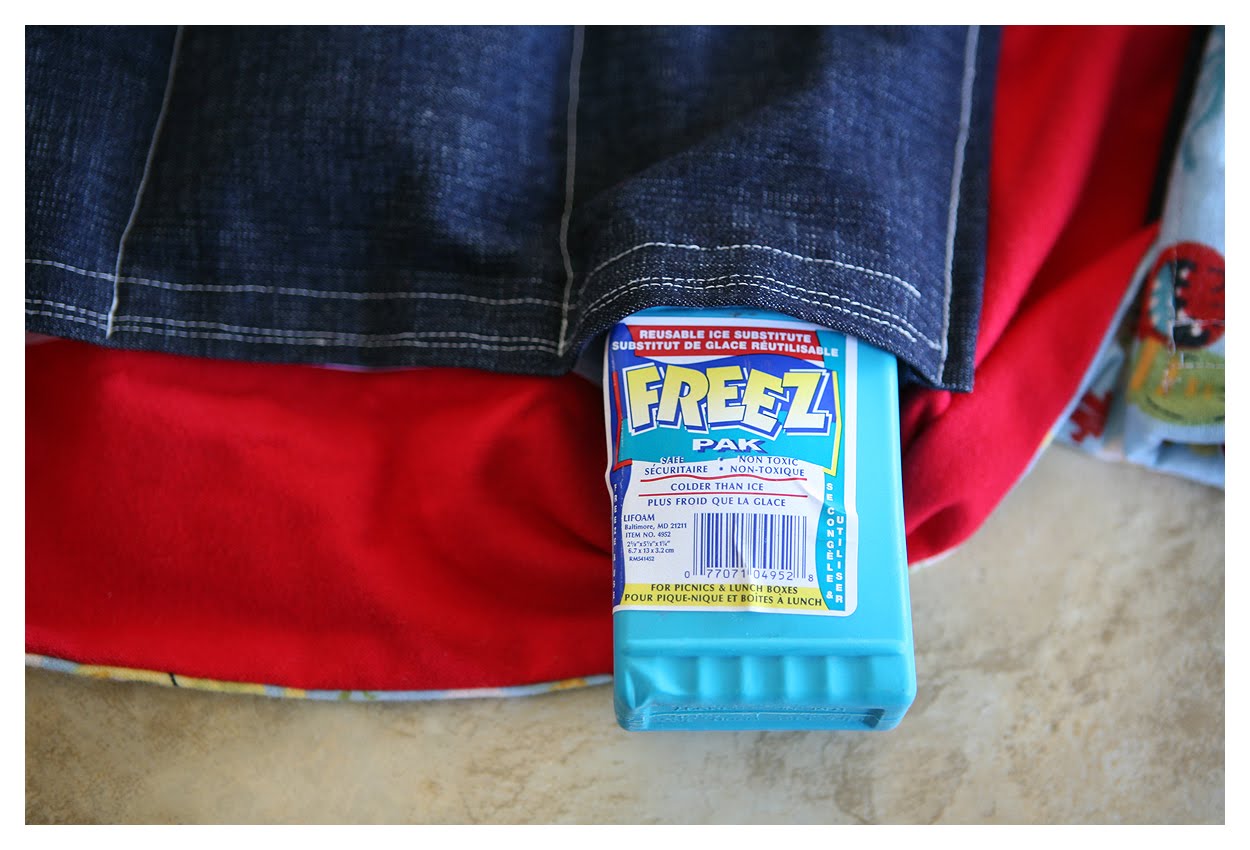
(either ice pack shown will work just fine, both were bought at wal-mart)
17. fold in the sides and roll it right up.
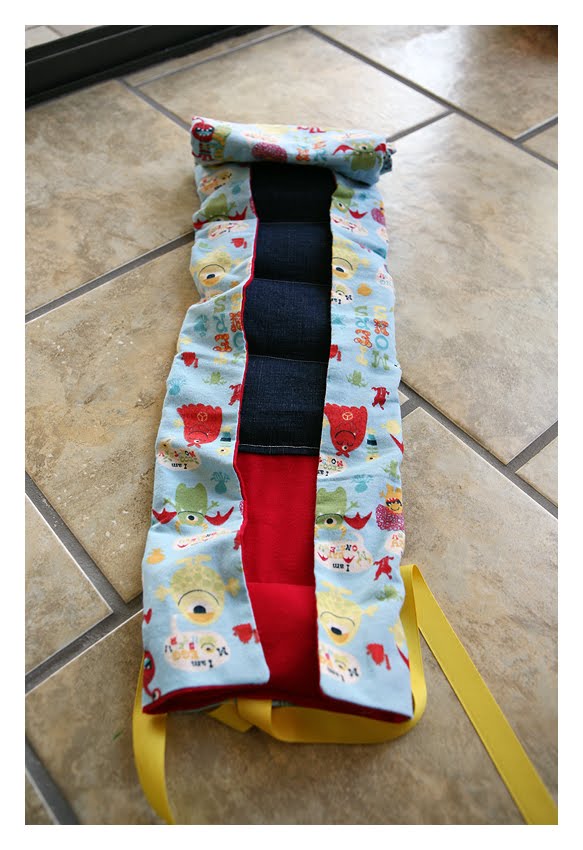
18. take it with you and while you are away at the pool or out of the car for any length of time, throw that puppy in the seat (make sure you tuck the buckles under it). when you get back, take it out and fold it back up and the seat will be nice and cool for that little bum your placing in it. they will love you for it. (then remember to put the packs back in the freezer for next time.)

how simple and easy is that? it is SO simple and easy!

Jodie
Latest posts by Jodie (see all)
- Our Friday Five | Jodie Edition - May 29, 2015
- Our Friday Five | Jodie Edition - April 24, 2015
- Toe-tally Awesome Teacher Gift - April 20, 2015
Very "cool" idea!! Most smart! I think people tend to forget about the wee ones and how hot those can get!
Thanks for sharing.
What a great idea! Those little metal parts on the buckle can get so hot! Thanks for a fabulous tutorial!
Love, Love, Love your site! Keep the great ideas coming ladies 🙂 If I knew how to sew (or owned a sewing machine) I would totally try this. Thanks for all your clever projects!
Great idea. Too bad we didn't have it 10 yrs ago. Haha.
this would we a great baby shower gift!
Thanks for such a great idea! It gets so hot around here, I hate taking my babies anywhere! Now there's a solution… Oh no, it's all up to me now. Yikes!
What a great tutorial! I've been trying to think through how I'd make one of these and I was most def overthinking it! Thank you!
GENIUS!
That is awesome! I have never sewn before but I just might have to start. Time to call up my mom and ask if I can borrow her machine.
I can't sew AT ALL. Seriously, if a button falls off I get a new shirt. But this makes me want to learn. It also made me search etsy. Maybe I won't have to learn to sew after all! 😉
Brilliant. Wish I'd have had this idea a few years ago! : )
Why are 1 1/2 yards of the two flannels needed, when the squares to cut are only 48" x 17"? Am I missing something? Probably! 🙂
My God! You are brilliant! I can't wait to try this out for myself! Thanks so much for the tutorial! 🙂
I've never even heard of these before- what a brilliant idea!! I'm featuring this tutorial today!
GENIUS! Great idea, thanks for the tutorial.
I LOVE your blog! I love all the crafts and projects…that is right up my alley! Thank you for visiting my blog…I look forward to following you! Have a great friday!
http://www.twin-spiration.com
Awww this is terrific! I am your newest follower from NFF! I love you blog! Be sure to check me out at mine…I love new friends!
~Terrell @ FrouFrouDecor~
Stopping by from NFF.
What a cute and creative idea! i don't have any carseats in my car for baby bums, but I'll hold on to this idea for the future. 🙂
I Love your blog! Here for Friday Follows – hope to see you at Dropped Stitches!
Erin
droppedstitches72.blogspot.com
that is pretty cool! I have no need to make that, but definitely a good idea!!
Hi! I am a new reader and follower of your blog…I just love it!! I can't wait to read more!! I have that same monster fabric..it's so cute…i still haven't used it…now i think i have an idea what to use it for ; ) thanks!
I love this! L-O-V-E! I just burned the be-geezes off my daughter's thighs the other day while in Southern Utah. (similar to Vegas weather) I felt so stinkin' bad. I had a boy first, and didn't have to worry too much about burned legs. But she had a dress on….you know. Anyway, this is just so genius. And she needs it right away! BIG FAN!!
I saw this post featured on Pleated Poppy. What an AWESOME project. Definitely on my to do list. Thanks for the awesome tutorial!!!!
That is a fantastic idea, I might have to make one of those for my gorgeous grand daughter, especially now that it is a requirement that kids under 7 have to sit on some kind of childseat….legal requirement. She's not quite 3 so one of these should last her a long time. Thanks for sharing the tutorial. Hugs Naomi
I may be a little dense but what is the smaller pocket for? The one that is out of the denim above the longer denim one?
Never mind I just figured it out, the smaller one is for the seat, and the longer one is for the back of the seat. Right?
Hi! Just wanted to let you know that I have given you the Beautiful Blogger Award because I think that you have a great blog.
http://www.mydeliciousambiguity.com/2010/07/new-awards-heaps-of-thanks.html
Have a great day!
-Jenn
My Delicious Ambiguity
Wow that is such a great idea! I love this! Thanks so much for sharing, I'll be linking.
My husband was just complaining that no one had invented a seat cooling system. They have heated seats, but nothing for the summer months! I can't wait to show him this! Too cool guys!
You're a GENIUS!!!!!
This is a brilliant idea.
Super Idea! I live in Vegas too, and lately (as you know) it has been SUPER hot!
CM
This would be such a great baby shower gift!!
LOVE IT!
http://www.aboutone.com
Helping you store what matters most!
Goodness! This is brilliant! I want one for me too. 🙂 I just found your website this morning and I am loving it.
I really wish I had known about this when my kids were in car seats. It's such a great idea. I laughed because I made pjs for my son with the guitar flannel. 🙂
absolutely brilliant! my poor son is drenched in sweat anywhere we go. i need to make this!
Great idea and tutorial! Thanks for sharing! Do you have a printable version (eg google doc or scribd?)
Made one today! Took a while to figure it all out, but it turned out soooo cute! My new baby niece will love it – she's in Vegas too (well she will be when she's born in 2 weeks) :). Thanks for the instructions.
googled the idea and found this tutorial….. THANK YOU! i just moved to vegas 8 months ago and will definitely be making this soon in preparation for this summer!
Wonderful blog and fantastic idea. I make and sell these, a little differnt design, though. 🙂 If someone doesn't have the time to sew themselves, head on over to my etsy site.
Lena
It doesn't get cooler than that.
Hi@ I made one for my sweet baby and one for a friend with a newborn. They turned out extremely well! Thank you so much for posting this!
Just a friendly reminder to remove this before placing your child in the seat. 🙂
Amazing idea! I thought "uhhh…this can't be safe to have between the baby and the carseat!" until I figured out that you just keep it in there until you put the kid IN the seat. DUH!! haha! Blonde moment.
Awesome tutorial, love it. My little one is always sweating by the time she gets out of her seat and this would definitely help!
Don't worry… I thought the same thing at first. 😉
Great idea – love this!!