• About
  • Advertising
  • Contact
  • Meet the Team
  • Blog
    • Bloglovin
    • Facebook
    • Instagram
    • Pinterest
    • Twitter

Eighteen25

Create A Life You Love.

  • Home
  • Printables
  • DIY + Crafts
  • Holidays
  • Recipes
    • All Recipes
    • appetizers
    • salads/side dishes
    • main dishes
    • Desserts
  • Misc.

Today’s Guest: Tatertots & Jello

Sep12010 posted by Jamie 22 Comments

Hi there eighteen25 readers!
My name is Jen from Tatertots & Jello and I am thrilled to be here today!! How exciting is this party? I LOVE Halloween, it really is one of my favorite holidays! I still love to dress up every year!
Today I thought I would share a fun little project — 

Painted Halloween Pennant Pillows!!

I had some pillow forms that I wanted to use. So I took those pillow forms and added 1 inch to each of the sides. {I used canvas because I had made some canvas pillows last Spring and they have really held up well}. I cut my canvas to the sizes I measured. I made envelope-back pillows — so for the back of the pillows, I measure the width and added 8 inches, then I cut that piece in half. This way, there is a 4 inch overlap in the back to slide the pillow form in.

Then I made my Pennant Templates. I decided that I wanted to make two different sizes of pennants. One is a triangle — 3 inches on all sides. The other is 4 inches across and 5 and half inches in length. I cut those out.

The next thing I did was I drew a curved line across the canvas with a pencil. On one pillow I drew three lines across and on the smaller pillow I only drew one line. Then I took my pennant and traced it across the line. On the smaller pillow I used the large pennant template, and on the larger pillow I used the smaller pennant template for contrast.

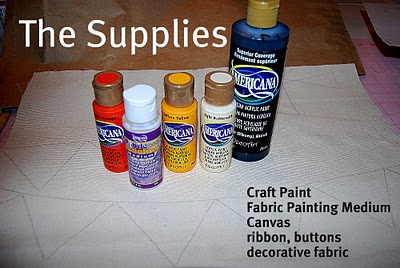
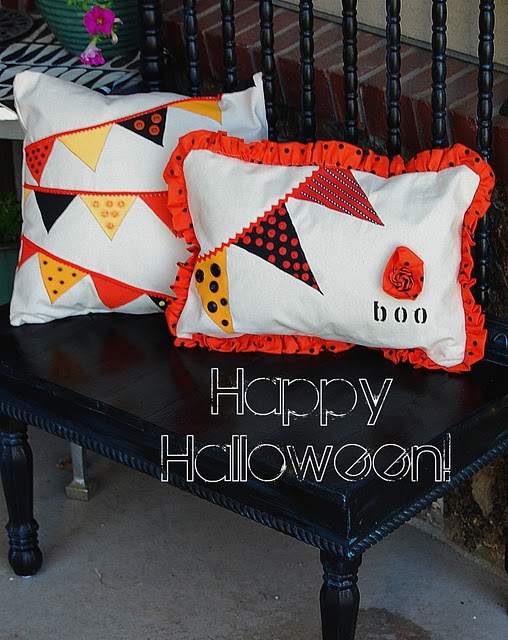
DecoArt makes this really cool medium that let’s you take any craft paint and make it into Fabric Paint. It’s pretty fun! I poured some paint on a paper plate and mixed the DecoArt Fabric Medium in with each color. Then I filled the pennants in with color. I used yellow, orange and black paint for the pennants.

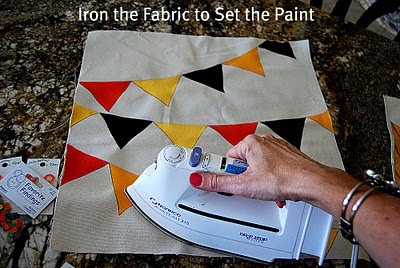
Once it dried, I ironed the fabric to set the paint as the instructions said. After that I traced the pennants with a fabric pen. And sewed the little buttons on each pennant.

And then I applied ribbon trim to the lines across the pillows. I used No-sew adhesive {Liquid Stitch} to put the trim on the pillows. I love that stuff – it is great to use! I let it dry overnight.

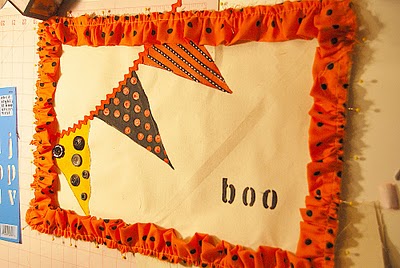
I decided to stencil on a little “boo” on the small pillow. And a little decorative flower!

Then I sewed the backs on to the pillows. To the smaller pillow, I made a little ruffle out of coordinating material. I measured the pillow all the way around and doubled the length. I cut the material at 5 inches in width and then folded it over and stitched it with a very wide stitch. Then I pulled the thread and ruffled the material up and then pinned it onto the front of the pillow. The next thing I did was I put the back on top and sewed the pillow together.

Once the pillow covers were sewn, I put my pillow forms in and voila! 
Halloween has arrived at my house!!

Thank you Jennifer, Jamie and Jodie — I had a wonderful time at your party!! 
XOXO

********************************************************
*************************************
thanks so much jen! i think i need a set of those pillows for my couch!  too fun!
i’m sure you’re already a tatertots and jello fan, but if not head on over and check out all the great ideas she has to share!
you’re going to like what you see!!   🙂
  • Bio
  • Latest Posts
Jamie

Jamie

Jamie

Latest posts by Jamie (see all)

  • Bird Feeders - May 24, 2019
  • [2014 WISHlists] Jamie’s List - December 12, 2014
  • Avery Custom Photo Gift Tags - December 2, 2014


22 Comments

« a FREE download and some EXCITING news
Today’s Guest: How Does She? »

Comments

  1. The Bonjour Four says

    September 1, 2010 at 1:17 pm

    Love it!! Only problem is I want more! 😉

    Reply
  2. Chocolate Mousie says

    September 1, 2010 at 1:27 pm

    I don't sew and I'm not into pillows, but I think I'll use this idea for part of a Halloween card. 🙂

    Reply
  3. ellie g says

    September 1, 2010 at 1:49 pm

    Whoa!!!! THIS TURNED OUT SO CUTE! I love that it's totally "Halloween-ee" but not dark and scary. The ric-rac on the big pennants makes me really happy. And I'm loving the button decorations on the smaller ones. It's really perfection! And totally something I'd be okay with getting out immediately. (I might have an OCD issue with when it's appropriate to decorate for Halloween. I know!)

    Jen rules! The End.

    Reply
  4. Suzanne says

    September 1, 2010 at 2:03 pm

    This pillow is fabulous! LOVE the design and the bright, happy Halloween colors. So original. You really hit a home run with these, Jen. So cute!

    Reply
  5. Carla G. says

    September 1, 2010 at 2:36 pm

    Those are adorable!!! Thanks for the tip on the fabric-medium..never heard of it and will be on the lookout too. These are fantastic!!

    Reply
  6. TidyMom says

    September 1, 2010 at 2:38 pm

    These are ADORABLE!!!…..so easy too!!
    Thanks for sharing Jen!

    Reply
  7. Susan Crabtree says

    September 1, 2010 at 2:41 pm

    SO adorable!

    Reply
  8. Jenglamgirl says

    September 1, 2010 at 3:08 pm

    Jen these are OH' SO PRECIOUS. I adore them. I love all the detail added to them. I SO SO SO WANT SOME. Well done friend! hugs, Jen

    Reply
  9. Jen~ Lipstick and Laundry says

    September 1, 2010 at 3:16 pm

    SEW cute… I love ALL things pennant!

    Reply
  10. Kari @ Ucreate says

    September 1, 2010 at 4:15 pm

    Holy Cute pillows!! Great job Jen!!

    Reply
  11. Allison says

    September 1, 2010 at 4:16 pm

    So adorable! These are just fabulous Jen!

    Reply
  12. Kelley says

    September 1, 2010 at 4:37 pm

    Very cute….WOW. I feel like I need to go get my Halloween decorations down now.

    Have a great day!

    Reply
  13. Heather says

    September 1, 2010 at 4:43 pm

    What a cute idea! I would like to make some of those for the settee on my front porch. 🙂

    Reply
  14. Lorie says

    September 1, 2010 at 5:31 pm

    I am so glad that Jen did a guest post today! Otherwise I may never have found your blog! I love it!

    Reply
  15. Natalie@Endless Crafting says

    September 1, 2010 at 6:06 pm

    These are adorable! I am so excited for Halloween!

    Reply
  16. Sandra {sawdust and paper scraps} says

    September 1, 2010 at 7:25 pm

    These are adorable and I never knew about that fabric paint medium. Very handy!

    Reply
  17. Lindsey @ Inspiring Creations says

    September 1, 2010 at 7:38 pm

    I love these!! I can't wait to start decorating for Halloween now! 🙂

    Reply
  18. Livin' the Yeh Life! says

    September 1, 2010 at 8:14 pm

    LOVE it! SOOOO cute!

    Reply
  19. Leslie says

    September 2, 2010 at 1:50 am

    Wow, they look amazing!!!!

    Reply
  20. Michelle@Somedaycrafts says

    September 2, 2010 at 2:45 am

    Jen is nothing short of amazing! I'm excited to see the month of WOW projects on your blog! This is going to be fun!

    Reply
  21. Susie says

    September 2, 2010 at 10:54 pm

    Adorableness! Love these 🙂

    Reply
  22. Jen says

    September 9, 2010 at 5:12 am

    Is there some instructions or description somewhere on your blog about the "spooky blocks" and the framed halloween "fabric or paper". I'd like to do both. Fall & Halloween are my favorite time of year!

    Reply

Leave a Reply Cancel reply

Your email address will not be published. Required fields are marked *

This site uses Akismet to reduce spam. Learn how your comment data is processed.

welcome!

We are Jodie & Jen, born & raised in Vegas, in a little brick house. The number hammered onto our mailbox was 1825. Visit us often & be inspired to create a life you love. Read More…

  • Bloglovin
  • Facebook
  • Instagram
  • Pinterest
  • Twitter

Subscribe by Email

Get our latest & greatest posts straight to your inbox.

featured posts

Bird Feeders
Instant Pot BBQ Chicken Sliders
Free Printable Watercolor Notebook Covers
DIY Disney Ideas
Disney Trip Fun Bags
Printable Recipe Binder

eighteen25 loves

Disney banner 350

Privacy Policy

stay updated on latest
posts on Facebook

The Girls at Eighteen25
  • Bloglovin
  • Facebook
  • Instagram
  • Pinterest
  • Twitter

Copyright © 2025 · All rights reserved · Site by Melissa Rose Design