• About
  • Advertising
  • Contact
  • Meet the Team
  • Blog
    • Bloglovin
    • Facebook
    • Instagram
    • Pinterest
    • Twitter

Eighteen25

Create A Life You Love.

  • Home
  • Printables
  • DIY + Crafts
  • Holidays
  • Recipes
    • All Recipes
    • appetizers
    • salads/side dishes
    • main dishes
    • Desserts
  • Misc.

Today’s Guest: Craftaholics Anonymous

Sep172011 posted by Jodie and Jen 4 Comments


hi! my name is linda and i’m a craft addict. i’m the girl behind Craftaholics Anonymous a site brimming with crafts, home decor, DIY, tutorials, and holiday decorating! my crafting philosophy is: Crafting doesn’t have to be expensive, just CREATIVE!

well i am just so happy to be participating in this fab event again this year! so many fun halloween projects have been shared. wow! i’m so excited for Halloween to get here!

i’m going to show you how to make these super cute mini paper pumpkins. these little cuties are perfect for scatter around your home, on a garland, in a vase, or a great addition to your spooky mantlescape! oh and they are incredibly easy and pocketbook friendly. 🙂 quick, easy crafts are my fave!

Supplies: 1 sheet double sided Halloween themed pattern paper, scissors/paper trimmer, hot glue, scraps of coordinating solid cardstock, 1″ circle punch

The How To’s

1. cut your pattern paper into 2.5″ by 0.5″ strips except for the last 2″x12″ strip. use your 1″ circle punch and cut out 1″ circles.

2. using your glue gun, glue the small strips of paper to the circle, overlapping them slightly. glue strips all the way around the circle. depending on how much you over lap them, it will take between 7 to 10 strips per pumpkin.

3. place it in your hand and cup your hands to curve the paper to hopefully prevent corners on the sides of your pumpkin

4. take a second 1″ circle and glue the strips underneath with your glue gun. this is what your pumpkin should look like at this point. if you want a short, fat pumpkin, you can smash it slightly. or if you want a taller, skinner pumpkin, simply press the strips together so the circles are pushed away from each other.

5. using the scraps of cardstock, cut stems out for each pumpkin. cut a 0.25 inch by 0.75 inch strip for the stem. bend over a small section so that you can glue the stem to the pumpkin.

ta-da! adorable little pumpkin! simple, easy, and fun to make. perfect.

looking for more fall crafts? check out my Fall Wreath or try my yummy Pumpkin Fudge recipe, its divine!

i had so much fun crafting with you today! let’s do it again, ok?

happy crafting!

linda {Craftaholics Anonymous}

. . . . . . . . .

thanks linda! such cute paper pumpkins!
and i don’t know about you… but i’ll for sure be checking out the pumpkin fudge recipe…. anything that starts with pumpkin and ends with fudge has to be fabulous, right?? 🙂
. . . . . . . . .
this post is sponsored by:
  • Bio
  • Twitter
  • Facebook
  • Pinterest
  • Latest Posts
Jodie and Jen

Jodie and Jen

I'm Jen Sedillo, one of the bloggers behind Eighteen25. I love creating and crafting, reading good books, visiting new places and being with family!
Jodie and Jen

@eighteen25girls

Jodie and Jen
Jodie and Jen

Jodie and Jen

Jodie and Jen

Latest posts by Jodie and Jen (see all)

  • Our Friday Five 9.30 - September 30, 2022
  • Our Friday Five 12.3 - December 3, 2021
  • Composition Book Christmas Planner - November 28, 2021


4 Comments

« Today’s Guest: Bee In Our Bonnet
Today’s Guest: Lil Luna »

Comments

  1. Susan says

    September 17, 2011 at 3:19 pm

    What lovely pumpkins! I'm a little teary-eyed because our daughter, Kelly loved pumpkin…anything! She passed away last year from breast cancer, but I'm making these to send to our grandson (age 3) who has her love for pumpkins. Thank you for the idea and recipe! XOXO

    Reply
  2. Linda@CraftaholicsAnonymous says

    September 17, 2011 at 5:55 pm

    Thanks for having me over, you cute crafty ladies! I love your fun event!
    happy crafting,
    linda

    Reply
  3. projectdowhatyoulove says

    September 17, 2011 at 6:05 pm

    Ooooh Love it! I love anything halloween and the weather is finally cooling down. I'm excited! Thanx for sharing!!

    Natalie
    http://www.projectdowhatyoulove.wordpress.com

    Reply
  4. Suzanne says

    September 17, 2011 at 6:23 pm

    This is a GREAT project! Thanks!

    Reply

Leave a Reply Cancel reply

Your email address will not be published. Required fields are marked *

This site uses Akismet to reduce spam. Learn how your comment data is processed.

Today’s Guest: Craftaholics Anonymous

Sep272010 posted by Jodie and Jen 15 Comments

Today we are super excited to have Linda from Craftaholics Anonymous here with us!! If you think you may be addicted to crafts, you’ll definitely want to check out her blog. She has a little bit of everything to help feed your addiction.

*********

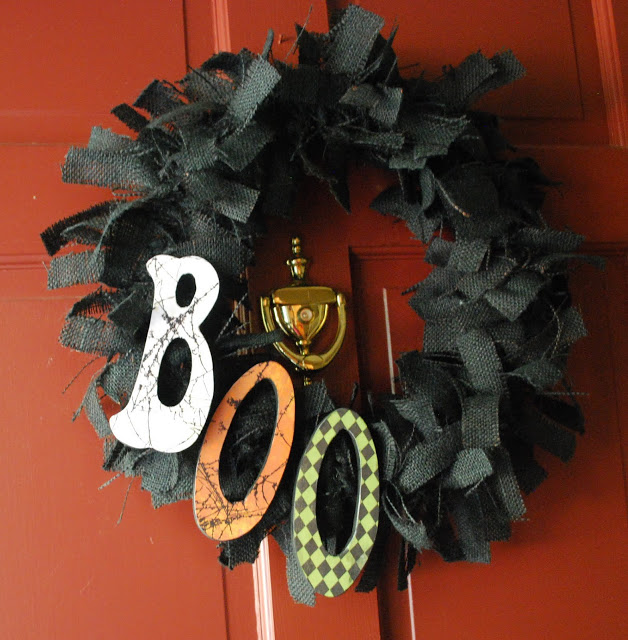
ok, i’m totally stoked to be guesting  here on eigheen25! especially with a Halloween craft……baby #2 is due right before Halloween….. so Halloween is pretty much a big deal at our house this year. don’t laugh but i made and hung this wreath on my door in August. i’m so pathetic! but that’s how excited i am for the baby Halloween to come! haha

black burlap Halloween wreath
this is a super easy, fun wreath to make. plus it doesn’t take long from start to finish.

Supplies
  • 1 yards of black burlap cut into 1″x16″ strips {i used a rotary cutter, but if you want to prevent most of the loose strands on your wreath, you could use this burlap cutting technique.}
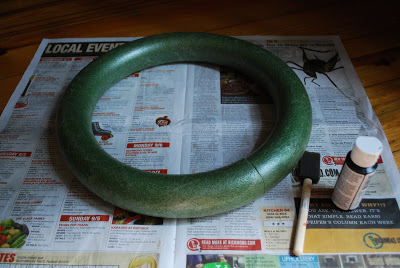
  • 14″ foam wreath ring
  • black paint {i used craft paint, but spray paint would work, too}
  • your SPOoKIEST findings to adorn this fab wreath
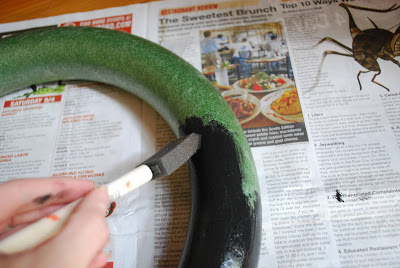
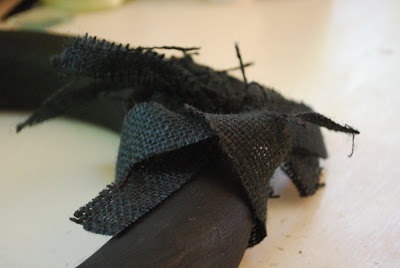
 paint your wreath ring black to hide the green under the burlap.
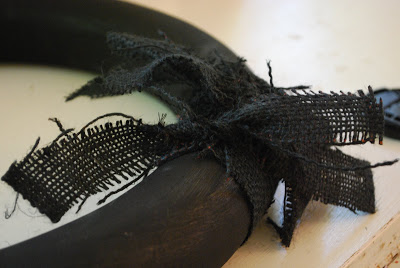
 when the paint dries, tie the burlap strips around the ring with a double knot.

 overlap the strips a little and bunch them together so you have a full wreath.keep adding strips and arranging until you like the overall look of the wreath. i also staggered the knots to give it a messy look.
*note: if you have to untie a strip, don’t plan to use it again. the burlap will basically be shredded.*

 embellish with your SPOoKIEST finds. 
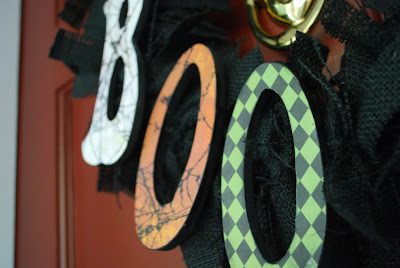
i used wooden letters, painted them black, and then mod podged Halloween paper to them. i attached them to the wreath by hot gluing the letters to the wreath base. {this requires pushing the burlap ends out of the way}

 and there you have a fun Halloween wreath! yay!

please stop by my blog, Craftaholics Anonymous and check out my other Halloween tutorials and crafts. i got some witch shoes you’re gonna love!! happy crafting!
 post signature

* * * * * * * * * * * *

Thanks Linda, for adding to our spooktacular fun. We’re pretty excited for you and your new little addition coming soon. Hope all goes well.

  • Bio
  • Twitter
  • Facebook
  • Pinterest
  • Latest Posts
Jodie and Jen

Jodie and Jen

I'm Jen Sedillo, one of the bloggers behind Eighteen25. I love creating and crafting, reading good books, visiting new places and being with family!
Jodie and Jen

@eighteen25girls

Jodie and Jen
Jodie and Jen

Jodie and Jen

Jodie and Jen

Latest posts by Jodie and Jen (see all)

  • Our Friday Five 9.30 - September 30, 2022
  • Our Friday Five 12.3 - December 3, 2021
  • Composition Book Christmas Planner - November 28, 2021


15 Comments

« Halloween Links
Today’s Guest: Less Cake {more frosting} »

Comments

  1. John, Kristie, Kendall & Dottie says

    September 27, 2010 at 1:09 pm

    Thank you for the idea! I am not crafty AT ALL yet I feel I can do this. So easy to end up with a super cute wreath!

    Reply
  2. Becky T says

    September 27, 2010 at 2:15 pm

    I love this! So much I may even attempt to make it. 🙂 And that is saying something! Quick question–where do you usually find black burlap? Maybe I just haven't paid attention, but I don't know if I've seen it anywhere…I'd love to know where to buy it. Thanks for the help and the FABULOUS idea!

    Reply
  3. Jen @ tatertotsandjello.com says

    September 27, 2010 at 2:25 pm

    So adorable!! Love it. It's so fun coming over here each day to see another fantastic idea!!!

    xox
    Jen

    Reply
  4. Erika says

    September 27, 2010 at 2:25 pm

    Such a cute idea. Think I may have to try this.

    Reply
  5. TidyMom says

    September 27, 2010 at 2:42 pm

    LOVE this idea!! I was just saying last night that I need a Halloween wreath for my front door!!

    Reply
  6. Chocolate Mousie says

    September 27, 2010 at 3:03 pm

    That is a really cool idea for a Halloween wreath! Thanks for posting it.

    Reply
  7. PeaceLoveApplesauce says

    September 27, 2010 at 4:27 pm

    Way cute!!

    Reply
  8. PC says

    September 27, 2010 at 5:49 pm

    Love this wreath! I just added the picture of it and your link to my Halloween Blog
    http://bucketsofhalloweenideas.blogspot.com/
    Thanks for sharing! Paula in Idaho

    Reply
  9. Kelli says

    September 27, 2010 at 6:56 pm

    I love this fast and easy wreath! Thanks for sharing!

    Kelli
    xoxo
    loveoursimplelife.blogspot.com

    Reply
  10. Erin says

    September 27, 2010 at 7:08 pm

    Love this wreath! Perfect for halloween

    Reply
  11. Christie says

    September 27, 2010 at 8:19 pm

    Oh! I'm loving this! Fabulous!

    Reply
  12. Tracy says

    September 28, 2010 at 1:00 am

    This is so fun
    Thanks for sharing.

    Reply
  13. sabriena says

    September 28, 2010 at 3:16 am

    This probably my favorite Halloween wreath I've seen lately!

    Reply
  14. ellie g says

    September 28, 2010 at 2:20 pm

    I've often thought about what I could do with black burlap. It's just so cute. Now I don't have to think any more! Such a cute idea! (and easy too!)

    Reply
  15. SandyM says

    September 28, 2010 at 3:04 pm

    I think we need one of these! My Mother In Law is coming to visit and I think this is the perfect project for us to do while she is here!

    http://www.sandym.myctmh.com

    Reply

Leave a Reply Cancel reply

Your email address will not be published. Required fields are marked *

This site uses Akismet to reduce spam. Learn how your comment data is processed.

welcome!

We are Jodie & Jen, born & raised in Vegas, in a little brick house. The number hammered onto our mailbox was 1825. Visit us often & be inspired to create a life you love. Read More…

  • Bloglovin
  • Facebook
  • Instagram
  • Pinterest
  • Twitter

Subscribe by Email

Get our latest & greatest posts straight to your inbox.

featured posts

Bird Feeders
Instant Pot BBQ Chicken Sliders
Free Printable Watercolor Notebook Covers
DIY Disney Ideas
Disney Trip Fun Bags
Printable Recipe Binder

eighteen25 loves

Disney banner 350

Privacy Policy

stay updated on latest
posts on Facebook

The Girls at Eighteen25
  • Bloglovin
  • Facebook
  • Instagram
  • Pinterest
  • Twitter

Copyright © 2025 · All rights reserved · Site by Melissa Rose Design